
No-Bake Chocolate Chip Cookie Dough Brownie Bombs

Tiny fudgy brownie bites sandwiched around buttery, eggless cookie dough, dipped in chocolate for an irresistible no-bake treat perfect for parties and holiday trays.

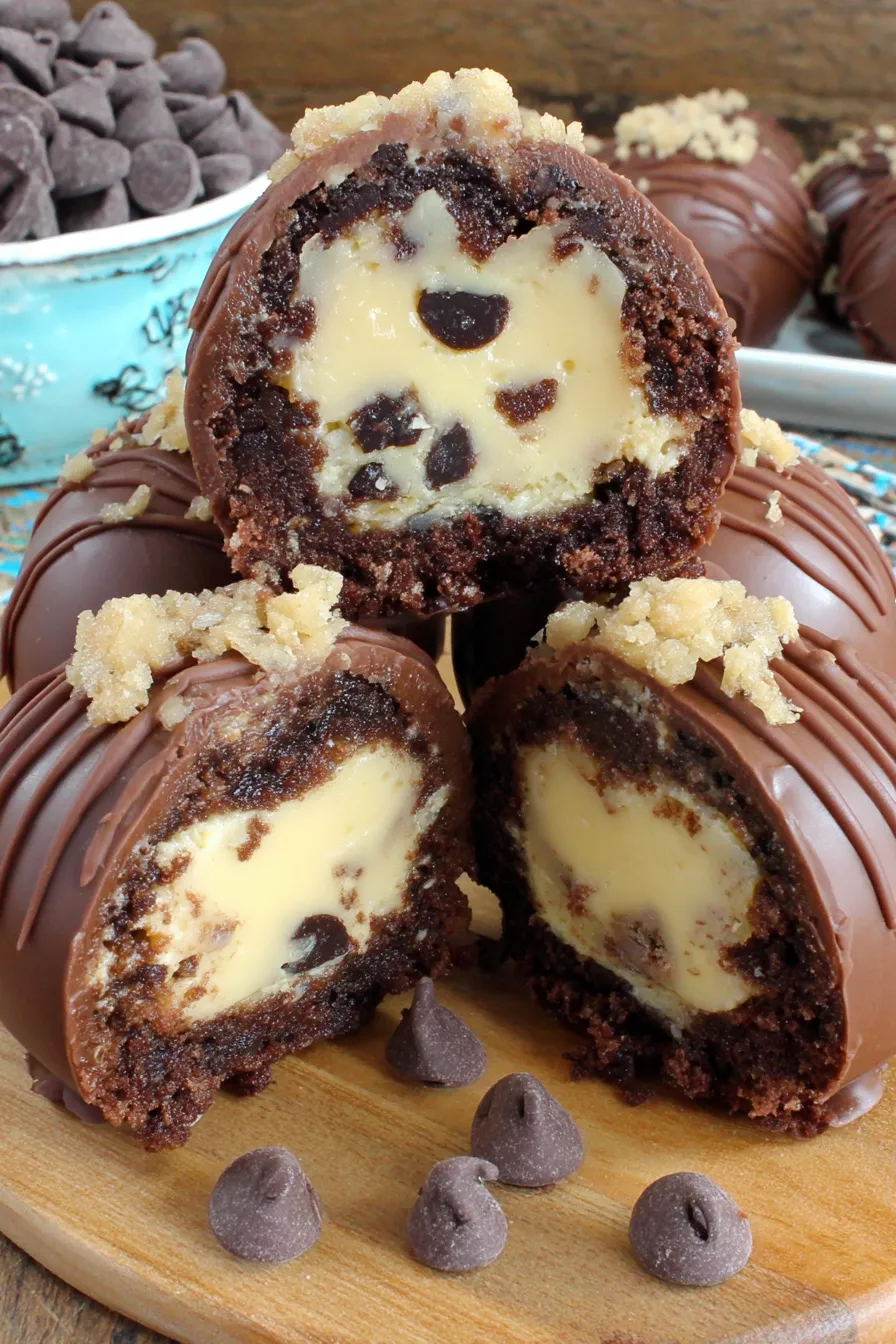
This recipe began as a playfully indulgent experiment for a holiday cookie swap and quickly became one of those treats that disappears before the plate even cools. These No-Bake Chocolate Chip Cookie Dough Brownie Bombs pair soft, bakery-style brownie bites with a rich, eggless cookie dough filling, then seal everything in a smooth chocolate shell. I discovered the combination when I was short on oven time but still wanted something that felt festive and homemade. The contrast of fudgy brownie, tender cookie dough, and crisp chocolate coating is what keeps friends asking for the recipe.
I first tested the idea using ready-made fudge brownie bites from the bakery section to save time and guarantee a consistent base. The batter for the dough is simple: butter, brown sugar, a little white sugar, milk, vanilla, flour, a pinch of salt, and mini chocolate chips folded in. After a brief chill, sandwiching the brownie bites with a rounded tablespoon of dough creates compact little bombs that are easy to dip and decorate. The chocolate coating gives them a professional finish that is showy but not fussy. Serve chilled or at room temperature for a crowd-pleasing confection that feels special without hours in the kitchen.
Why You'll Love This Recipe
- Ready with minimal hands-on time: use prepared fudge brownie bites and a quick eggless dough to finish in under an hour of active time.
- Perfect for those who shy away from raw eggs: the dough is made without eggs but still creamy and satisfying.
- Make-ahead friendly: freeze or refrigerate the assembled bites, then dip in chocolate when ready for serving to save time on the day of your event.
- Uses pantry staples: brown sugar, butter, flour, and mini chips are common and adaptable for substitutions.
- Crowd-pleaser for parties, cookie exchanges, and holiday trays: small, handheld, and indulgent, they travel well when chilled.
- Customizable finishing: top with extra mini chips, sprinkles, or a drizzle of contrasting chocolate to match the occasion.
At my first gathering where I served these, everyone complimented the texture. People assumed they had taken hours to make. Between the crunch of the shell and the soft interior, they hit all the notes I look for in a festive treat. My kids called them "bite-sized brownies with a secret center" which is now their official name in our house.
Ingredients
- Prepared fudge brownie bites: Three packages totaling about 42 brownie bites from the bakery section. Choose dense, fudgy bites rather than cakey varieties so they stand up to handling and remain moist under the dough.
- Chocolate CandiQuik: One and one-half packages. This brand melts smoothly and sets with a glossy finish. If unavailable, use candy coating wafers or tempered chocolate for a similar result.
- Butter: Three quarters cup softened. Use unsalted European-style butter for richer flavor, or salted butter and omit any extra salt in the dough.
- Brown sugar: Three quarters cup packed. Light brown sugar keeps the dough mellow; dark brown gives a more molasses note that pairs beautifully with chocolate.
- White sugar: One quarter cup. Balances sweetness and helps the dough hold shape without becoming grainy.
- Vanilla extract: One tablespoon. Pure vanilla adds depth and lifts the buttery cookie dough profile.
- Milk: Two teaspoons. A touch of liquid helps the dough come together while keeping it firm enough to scoop.
- All-purpose flour: Two cups. Use spoon-and-level technique when measuring to avoid a dry, crumbly dough.
- Salt: Pinch. Enhances the sweetness and balances the chocolate-rich flavors.
- Mini chocolate chips: One and one-half cups divided. Fold one cup into the dough and reserve half a cup for garnish and popping into the warm coating.
Instructions
Make the cookie dough: In the bowl of a stand mixer fitted with the paddle attachment, cream together three quarters cup softened butter, three quarters cup packed brown sugar, and one quarter cup white sugar until the mixture is smooth and slightly lighter in color, about two minutes at medium speed. Add two teaspoons milk and one tablespoon vanilla extract and mix until combined. With the mixer on low, add a pinch of salt and two cups all-purpose flour gradually until a soft, slightly sticky dough forms. Stir in one cup of the mini chocolate chips using a spatula so they are evenly distributed. Assemble the sandwiches: Lay out the prepared fudge brownie bites on a clean surface. Take one brownie bite and place a rounded tablespoon of cookie dough on top. Gently press another brownie bite on top to form a compact sandwich. Repeat until you have about 20 to 21 sandwiches. Arrange them on a foil-lined baking sheet with a little space between each to make coating easier. Chill until firm: Place the baking sheet in the freezer for 30 to 60 minutes, or in the refrigerator for at least one hour, until the dough is firm to the touch. Proper chilling prevents the dough from slipping off during dipping and helps the coating set cleanly. Melt the coating: Melt one and one-half packages Chocolate CandiQuik according to package directions until smooth. If using a microwave, heat in short bursts, stirring in between to avoid scorching. Maintain the coating at a warm but not hot temperature for easy dipping. Dip and decorate: Remove a chilled sandwich from the freezer, hold it on a fork, and dunk into the melted coating, turning to fully enrobe the piece. Let excess drip off, then return to the foil-lined sheet. Immediately sprinkle with the remaining half cup mini chocolate chips so they adhere before the coating sets. Continue until all pieces are coated. Set and store: Allow the coating to harden at room temperature for about 20 minutes or place the tray in the refrigerator for 10 to 15 minutes to speed setting. Store leftover pieces in the refrigerator for up to three days or in the freezer for up to one month. Thaw chilled portions briefly at room temperature before serving to soften slightly.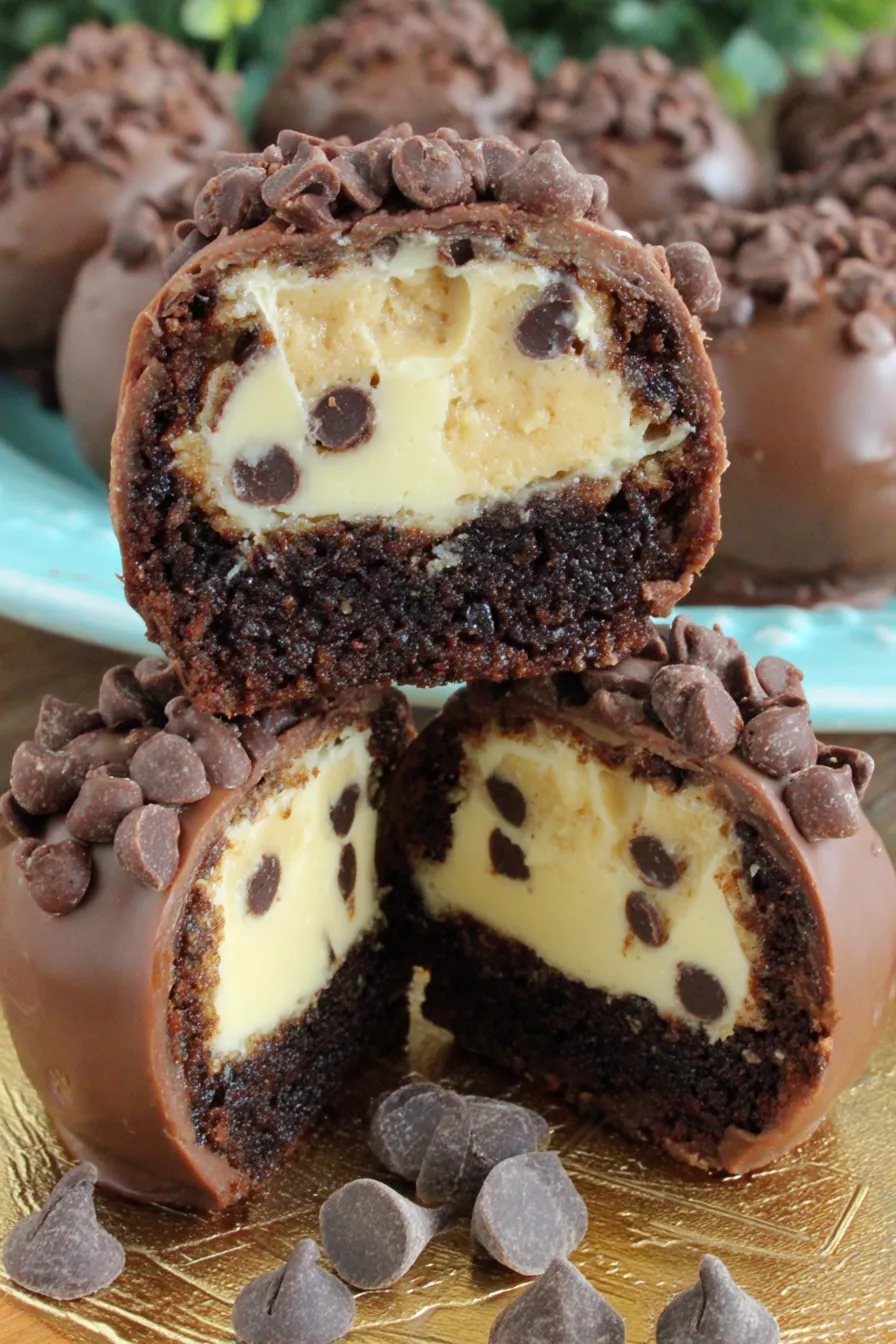
You Must Know
- These keep best chilled. Refrigerate in an airtight container for up to three days and freeze for up to one month to preserve texture.
- Because the dough is eggless, it is safe to eat raw and especially well suited for no-bake confections.
- Freeze the assembled sandwiches before dipping to prevent movement and to make coating neater and faster.
- Mini chips on top help identify each piece and add a second chocolate texture after the shell sets.
My favorite part of making these is the assembly line rhythm. Once the dough is mixed and the bites are chilled, dipping becomes almost meditative. I enjoy experimenting with different toppings, and once someone tried a salted almond on top and it became the unexpected star. That kind of improvisation keeps this recipe fresh and fun to make again and again.
Storage Tips
Store finished pieces in a single layer or separated by parchment if stacking to avoid sticking. Use an airtight container to prevent moisture from softening the chocolate shell. Refrigerate for up to three days. For longer storage, freeze in a freezer-safe container for up to one month. Thaw individual pieces at room temperature for 10 minutes before serving to restore soft chewiness in the interior. If transporting, place chilled pieces in an insulated bag with an ice pack so the coating stays firm.
Ingredient Substitutions
If you do not have Chocolate CandiQuik, use candy coating wafers or melt high-quality chocolate chips with one teaspoon vegetable oil per cup to mimic a smoother dipping texture. For a gluten-free option, substitute a 1-to-1 gluten-free flour blend for the two cups of all-purpose flour. To reduce sweetness a bit, swap half the mini chips for chopped toasted pecans or almonds. Coconut oil can replace some of the butter if you want a dairy-free variation, but the texture will be slightly different and the result should be chilled longer to firm up.
Serving Suggestions
Serve these on a dessert platter with small paper liners to keep fingers clean. They pair well with strong coffee, espresso, or a glass of cold milk. For a holiday tray, alternate with peppermint bark and spiced cookies for color contrast. Garnish with a light dusting of cocoa powder or a sprinkle of flaky sea salt for a more sophisticated finish. They are also great as favors; wrap individually in clear cellophane ties for party gifts.
Cultural Background
The idea of sandwiching cookie dough inside another confection is part of a long tradition of playful confectionery. While not tied to a specific cuisine, these types of hybrid sweets are popular in American holiday baking where portability and novelty are prized. Using readymade brownie bites is a modern convenience that reflects how home bakers adapt classic flavors into new forms for parties and exchanges.
Seasonal Adaptations
Change the finishing touches to suit the season. For winter holidays, add red and green nonpareils or a peppermint crunch. In summer, use a sea salt sprinkle and a white chocolate drizzle for a lighter look. For autumn, fold in a quarter cup of finely chopped toasted pecans and swap a tablespoon of vanilla for maple extract in the dough for a warm seasonal note.
Meal Prep Tips
Make the cookie dough and assemble the sandwiches ahead of time. Freeze assembled but uncoated sandwiches on a baking sheet, then transfer to a sealed container. Melt and dip right before your event to retain the freshest-looking shine and most satisfying snap. If preparing for a large crowd, divide tasks: one person mixes dough, another assembles sandwiches, and a third person handles dipping while the fourth decorates. Working in an assembly line reduces frustration and speeds production.
These no-bake bombs are a shortcut to something that looks elaborate but comes together with simple steps and a little patience while chilling. They are perfect for celebrations, and once you make a batch you will likely find new finishing ideas to make them your own.
Pro Tips
Chill assembled sandwiches thoroughly before dipping to prevent slipping and messy coating.
Use a fork and tap gently to remove excess coating for a smooth finish.
Reserve some mini chips to press into the coating immediately after dipping so they stick before the shell sets.
Work in small batches when melting coating to avoid overheating and seizing of the chocolate.
This nourishing no-bake chocolate chip cookie dough brownie bombs recipe is sure to be a staple in your kitchen. Enjoy every moist, high protein slice — it is perfect for breakfast or as a wholesome snack any time.
FAQs about Recipes
Can I eat the cookie dough uncooked?
Yes. The dough is eggless and safe to eat raw. Chill the assembled sandwiches before dipping for best results.
How long do these keep?
Store in an airtight container in the refrigerator for up to three days or freeze up to one month.
Tags
No-Bake Chocolate Chip Cookie Dough Brownie Bombs
This No-Bake Chocolate Chip Cookie Dough Brownie Bombs recipe makes perfectly juicy, tender, and flavorful steak every time! Serve with potatoes and a side salad for an unforgettable dinner in under 30 minutes.
Ingredients
Base
Coating
Cookie Dough
Instructions
Cream the sugars and butter
In a stand mixer fitted with the paddle attachment, cream 3/4 cup softened butter with 3/4 cup packed brown sugar and 1/4 cup granulated sugar for about two minutes until smooth and slightly lighter in color.
Add liquid and dry ingredients
Mix in 2 teaspoons milk and 1 tablespoon vanilla. On low speed, add a pinch of salt and 2 cups all-purpose flour gradually until a soft dough forms. The dough should be firm enough to hold shape.
Fold in chips and assemble
Stir in 1 cup mini chocolate chips by hand. Place a rounded tablespoon of dough on a brownie bite and sandwich with another brownie bite. Repeat to make about 20 to 21 sandwiches.
Chill sandwiches
Place assembled sandwiches on a foil-lined baking sheet and freeze for 30 to 60 minutes or refrigerate for at least one hour until firm.
Melt coating
Melt 1 1/2 packages Chocolate CandiQuik according to package directions until smooth. Keep warm but not too hot to ensure easy dipping.
Dip and garnish
Using a fork, dunk each chilled sandwich into the melted coating to fully enrobe it. Set back on the lined sheet and immediately top with reserved mini chips to adhere while the coating is wet.
Set and store
Let the coating harden at room temperature or chill briefly. Store in the refrigerator for up to three days or freeze for up to one month.
Last Step: Please leave a rating and comment letting us know how you liked this recipe! This helps our business to thrive and continue providing free, high-quality recipes for you.
Nutrition
Did You Make This?
Leave a comment & rating below or tag
@paletina on social media!
Categories:
You might also like...

Chocolate Chunk Marshmallow Brownies
Ultra-fudgy brownies packed with chocolate chunks, crowned with gooey marshmallows and glossed with warm chocolate frosting for a decadent crowd-pleaser.

Buttery Pecan Pie Bars
Buttery shortbread crust topped with a gooey brown sugar-pecan filling. Ten minutes to prep, irresistibly crunchy edges, and perfect for make-ahead treats.

Creamy Pumpkin Cheesecake
Silky, crack-free pumpkin cheesecake with warm spice, buttery graham crust, and make-ahead convenience for showstopping holiday dinners.
Did You Make This?
Leave a comment & rating below or tag @paletina on social media!
Rate This Recipe
Share This Recipe
Enjoyed this recipe? Share it with friends and family, and don't forget to leave a review!
Comments (1)
This recipe looks amazing! Can't wait to try it.
Comments are stored locally in your browser. Server comments are displayed alongside your local comments.

Hi, I'm Isabella!
What's Popular

30-Minute Meals!
Join to receive our email series which contains a round-up of some of our quick and easy family favorite recipes.