Mini Apple Hand Pies - Easy Fall Treat
30-MINUTE MEALS! Get the email series now
Royal Recipe

Mini Apple Hand Pies

5 from 1 vote
1 Comments
Isabella Jane
By: Isabella JaneUpdated: Mar 22, 2026
This post may contain affiliate links. Please read our disclosure policy.

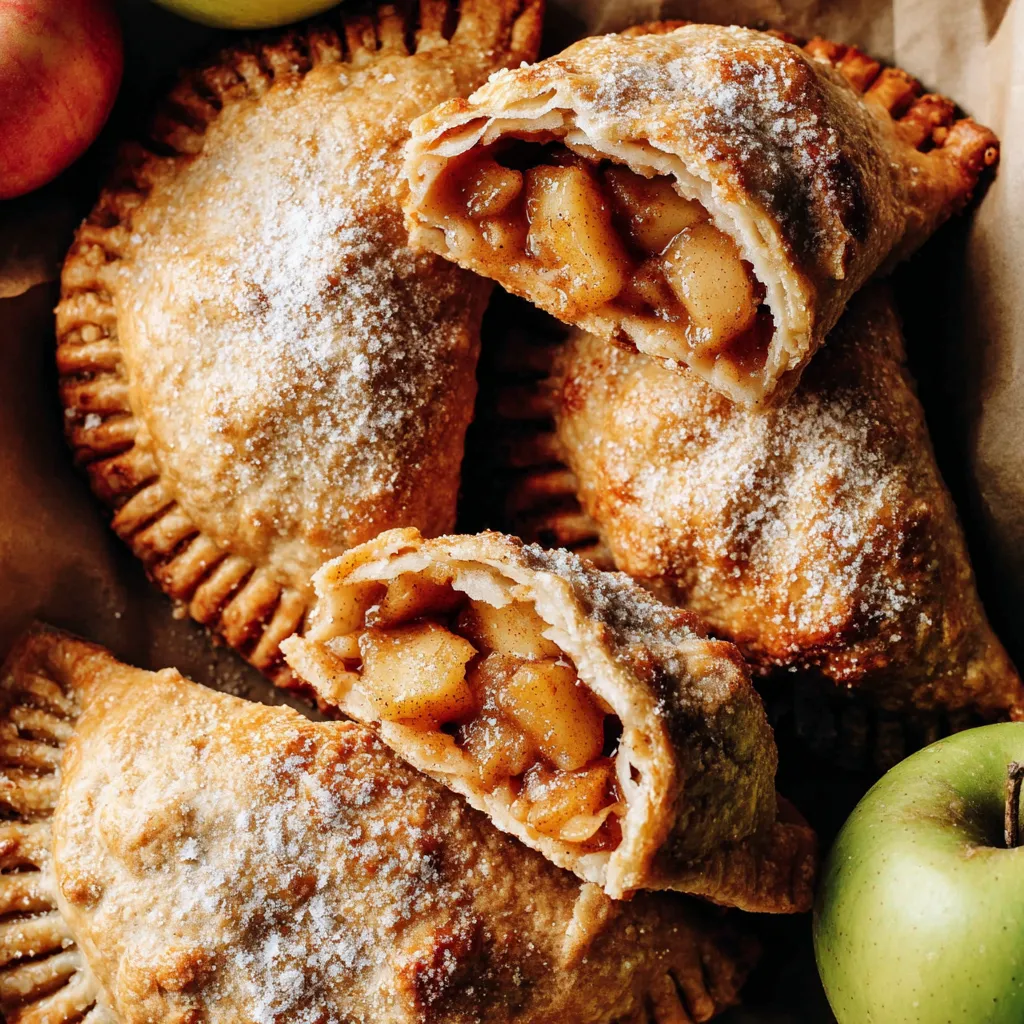
Flaky mini hand pies filled with tender cinnamon-sweet apples — the perfect portable dessert or afternoon treat made with store-bought dough for an easy, nostalgic bake.

Mini Apple Hand Pies
This recipe for mini apple hand pies has been a warm, fall-favorite ritual in my kitchen for years. I first discovered the joy of making tiny hand pies during a weekend when I wanted something portable and nostalgic: a cross between a classic apple pie and a tender turnover. These little apples are small enough for a picnic, impressive enough for a holiday platter, and comforting enough to make on an ordinary Tuesday. They deliver a buttery crust that flakes on the first bite and a soft, cinnamon-kissed apple interior that still holds a little texture. I remember serving them at my daughter’s school bake sale — they vanished in minutes — and at home they always prompt requests for seconds. What makes these especially memorable is their mix of simplicity and technique. Using store-bought pie dough keeps the process approachable, but the filling is cooked on the stovetop so the apples are perfectly tender and thickened before they ever meet the pastry. The lemon brightens the flavor and a quick cornstarch slurry gives the filling a silky body that won’t turn the crust soggy. I usually make a double batch and freeze half for last-minute desserts; reheated in a low oven they regain their crisp edges and warm, spiced apple center.

Why You'll Love This Recipe

  • Made with pantry-friendly staples and one box of store-bought pie dough, these take the stress out of pastry while delivering fresh-baked results similar to a classic pie.
  • Ready in about 45 minutes total: roughly 20–25 minutes active prep plus 12–14 minutes baking per batch — perfect for weeknights or unexpected guests.
  • Portable and portion-controlled: each mini pie is a single serving, great for gatherings, lunchboxes, or a coffee shop-style treat at home.
  • Customizable: use Fuji or Honeycrisp for firm sweetness, swap brown sugar for maple syrup, or choose plant-based butter for a dairy-free option.
  • Make-ahead friendly: filling keeps in the refrigerator for 3–4 days and assembled pies can be frozen before baking for up to 3 months.

Every time I make these the family gathers around the counter while I cut the pastry and spoon in filling. My partner insists on the cinnamon-sugar finish, and my youngest loves helping crimp the edges with a fork — those moments are what turn a recipe into a memory.

Ingredients

  • Pie dough: One box store-bought pie dough (two sheets). I use a high-quality refrigerated brand that bakes up flaky; if you prefer gluten-free, look for a labeled gluten-free refrigerated crust or make a shortcrust with 1 cup gluten-free flour + 2 tablespoons sugar + 6 tablespoons cold butter replacement. Keep the dough cold until cutting so it stays flaky.
  • Butter: 2 tablespoons unsalted butter. Regular or plant-based both work — butter adds flavor and sheen to the filling; use a neutral plant-based block if avoiding dairy.
  • Apples: 2 1/2 cups finely chopped Fuji or Honeycrisp (about 2 large apples). Choose firm apples so the pieces maintain a slight texture after cooking; these varieties hold up and offer bright sweetness.
  • Brown sugar: 1/4 cup packed light brown sugar. The molasses in brown sugar deepens the flavor and pairs beautifully with cinnamon.
  • Cinnamon: 1 teaspoon ground cinnamon for the filling, plus 1 teaspoon mixed with granulated sugar for sprinkling. Fresh ground cinnamon gives the best aroma.
  • Lemon juice: Juice of 1/2 lemon to lift the sweetness and keep the apples vibrant.
  • Cornstarch slurry: 1/2 teaspoon cornstarch mixed with 1 tablespoon water to thicken the filling without clouding the taste.
  • Egg wash: 1 large egg beaten with 2 teaspoons water for sealing and glazing.
  • Cinnamon sugar: 1/2 cup granulated sugar combined with 1 teaspoon ground cinnamon to sprinkle on top for crunch and sparkle.

Instructions

Bring dough to room temperature: Remove the two sheets of refrigerated pie dough from the box and set them on the counter while you prepare the filling. About 15–20 minutes at room temperature will make the sheets pliable for rolling and cutting; they should still feel cool to the touch so they don’t become greasy when worked. Cook the apples: Heat a medium saucepan over medium heat and melt 2 tablespoons of butter. Add 2 1/2 cups finely chopped apples, 1/4 cup packed light brown sugar, 1 teaspoon ground cinnamon, and the juice of 1/2 lemon. Stir to combine and cook for about 10 minutes, stirring occasionally, until the apples are tender and the pan is glossy with their juices. Adjust heat so the mixture simmers gently and the fruit softens without breaking down completely. Thicken the filling: Whisk 1/2 teaspoon cornstarch with 1 tablespoon water in a small dish until smooth and pour into the simmering apples. Stir continuously for 30–60 seconds as the filling thickens; you should see it hold together and become slightly translucent. Remove from heat and transfer to a shallow bowl to cool to room temperature — filling that is too warm will make the pastry soggy when assembled. Preheat and prepare pans: Preheat the oven to 400°F and line a large rimmed baking sheet with parchment paper. Arrange a cooling rack nearby because the pies rest briefly on the sheet and finish on the rack. Roll and cut shapes: Lightly dust a work surface with flour. Place one pie dough sheet down and gently roll it just enough to smooth out wrinkles and flatten seams — don’t overwork it. Using an apple-shaped cookie cutter or a homemade apple template cut roughly eight shapes per sheet; reroll scraps once or twice to maximize yield. Refrigerate the cut shapes on a tray while you finish the other sheet so they stay firm for filling. Fill and seal: Place half of the shapes on the prepared baking sheet, spaced with at least an inch between them. Spoon approximately 1 tablespoon of cooled filling into the center of each, leaving a 1/4-inch border. Lightly beat 1 large egg with 2 teaspoons water and brush the exposed border with egg wash. Take the matching top shapes, cut four small slits in their centers to vent steam, and place them over the filling. Press gently at the seams and crimp edges with a fork to seal; then brush the top with egg wash. Finish and bake: Mix 1/2 cup granulated sugar with 1 teaspoon ground cinnamon and sprinkle about 1 teaspoon of the cinnamon sugar on each pie. Bake for 12–14 minutes at 400°F, rotating the sheet halfway through for even color. The pies are done when the pastry is golden and the filling bubbles through the vents. Let cool 5 minutes on the baking sheet, then transfer to a rack to finish cooling. User provided content image 1

You Must Know

  • These are best eaten the day they’re baked for maximum flake and fresh warmth; assembled but unbaked pies freeze well for up to 3 months.
  • Filling stored in the refrigerator keeps for 3–4 days and can be reheated gently on the stovetop; add a splash of water if the mixture stiffens.
  • If you want dairy-free, use a firm plant-based butter and verify your pie dough is also dairy-free.
  • Each mini pie contains about 210 calories and is high in carbohydrate from the pastry and apples; they make a comforting treat, not a daily staple.

What I love most about these small pies is how they encourage company in the kitchen. Friends lean in to help crimp or press vents, and kids delight in the cinnamon sparkle. They’re proof that simple techniques — pre-cooking fruit, thickening correctly, and keeping dough cool — elevate a humble pastry into something that feels celebratory.

Storage Tips

To store leftovers, place cooled pies in an airtight container and keep them at room temperature for up to 24 hours; for longer life refrigerate for up to 3 days. For freezing, flash-freeze assembled unbaked pies on a tray until firm, then transfer to a labeled freezer bag for up to 3 months. Bake from frozen at 375°F for 16–18 minutes, or until golden and bubbling, adding a few minutes as needed. Reheating baked pies in a 325°F oven for 5–8 minutes restores crispness much better than the microwave.

User provided content image 2

Ingredient Substitutions

If you don’t have Fuji or Honeycrisp, Gala or Braeburn are excellent substitutes; avoid overly soft varieties like McIntosh unless you want a very tender, almost jammy interior. Swap light brown sugar for dark brown for deeper molasses notes or use 2 tablespoons maple syrup plus 2 tablespoons granulated sugar for a different sweetness profile. For a gluten-free option, choose labeled gluten-free refrigerated crusts or make a gluten-free shortcrust swap and chill thoroughly before rolling. To reduce sugar, cut the sprinkling sugar in half and use 2 tablespoons less brown sugar — lemon and cinnamon will maintain depth of flavor.

Serving Suggestions

Serve warm with a scoop of vanilla ice cream or a dollop of crème fraîche for an elegant finish. For a morning treat, these are excellent alongside coffee or tea and pair nicely with a sharp cheddar for contrast. Garnish with a light dusting of powdered sugar or a drizzle of salted caramel for a crowd-pleasing dessert board. Because they’re individually portioned, they work well on charcuterie trays next to nuts and aged cheeses at holiday gatherings.

Cultural Background

Hand pies have long been a portable pie tradition in many cuisines, from Cornish pasties in the UK to empanadas in Spain and Latin America. These small apple hand pies draw from American apple-pie tradition, adapting the filling and pastry into single-serve portions that echo the communal nature of handheld pastries. Their portability made them ideal for workers and travelers in the past, and today they’re a nostalgic nod to that convenience with an elegant twist.

Seasonal Adaptations

In autumn emphasize warm spices: add 1/4 teaspoon ground nutmeg and a pinch of ground cloves to the filling. In winter swap apples for pear halves folded with ginger and a splash of brandy for holiday adults-only versions. For summer, try a mix of apples with fresh berries, reducing cornstarch slightly to compensate for berry juices. The method stays the same: cook the fruit first, cool, then assemble and bake for consistent results year-round.

Meal Prep Tips

Prepare the filling up to 3 days in advance and refrigerate. Cut pastry shapes, stack between parchment, and freeze if you plan to bake later — frozen assembled pies bake well from frozen with a few extra minutes. For batch baking, rotate sheets and watch closely during the second batch since oven heat can shift; use an oven thermometer if your oven runs hot. Label frozen trays with the date and bake within 3 months for best quality.

These mini apple hand pies are a small labor of love that reward with big, cozy flavors. Whether you make a few for an afternoon treat or a platter for sharing, they bring warmth and easy nostalgia to your kitchen — and that’s the best part of baking.

Pro Tips

  • Keep the dough as cool as possible while working to maintain flaky layers; refrigerate cut shapes if they begin to soften.

  • Cook the filling until it’s slightly thickened and cooled before assembling to prevent a soggy bottom.

  • Use a gentle egg wash and crimp edges well to ensure the pies stay sealed while baking.

  • If the top browns too quickly, tent loosely with foil and finish baking until the filling bubbles.

This nourishing mini apple hand pies recipe is sure to be a staple in your kitchen. Enjoy every moist, high protein slice — it is perfect for breakfast or as a wholesome snack any time.

FAQs about Recipes

Can I prepare the filling in advance?

Yes — the filling can be made up to 3 days ahead and stored in the refrigerator in an airtight container.

Can I freeze the hand pies?

Assembled, unbaked pies can be frozen on a tray and then bagged for up to 3 months. Bake from frozen and add a few minutes to the baking time.

Tags

Comfort ClassicsMini Apple Hand Piesapple hand piesfall dessertsbakingrecipespaletinaeasy dessertspicnic treats
No ratings yet

Mini Apple Hand Pies

This Mini Apple Hand Pies recipe makes perfectly juicy, tender, and flavorful steak every time! Serve with potatoes and a side salad for an unforgettable dinner in under 30 minutes.

Servings: 16 steaks
Mini Apple Hand Pies
Prep:25 minutes
Cook:14 minutes
Rest Time:10 mins
Total:39 minutes

Ingredients

Filling

Topping

Instructions

1

Bring dough to room temperature

Remove pie dough from the refrigerator and let it sit 15–20 minutes until pliable but still cool to the touch.

2

Cook the apples

Melt 2 tablespoons butter in a saucepan over medium heat. Add apples, brown sugar, cinnamon, and lemon juice. Cook about 10 minutes until apples are tender and juicy, stirring occasionally.

3

Thicken the filling

Stir cornstarch slurry into the apples and heat 30–60 seconds until the mixture thickens. Remove from heat and cool to room temperature before assembling.

4

Preheat and prepare pan

Preheat oven to 400°F and line a baking sheet with parchment paper. Have a cooling rack ready for finished pies.

5

Roll and cut

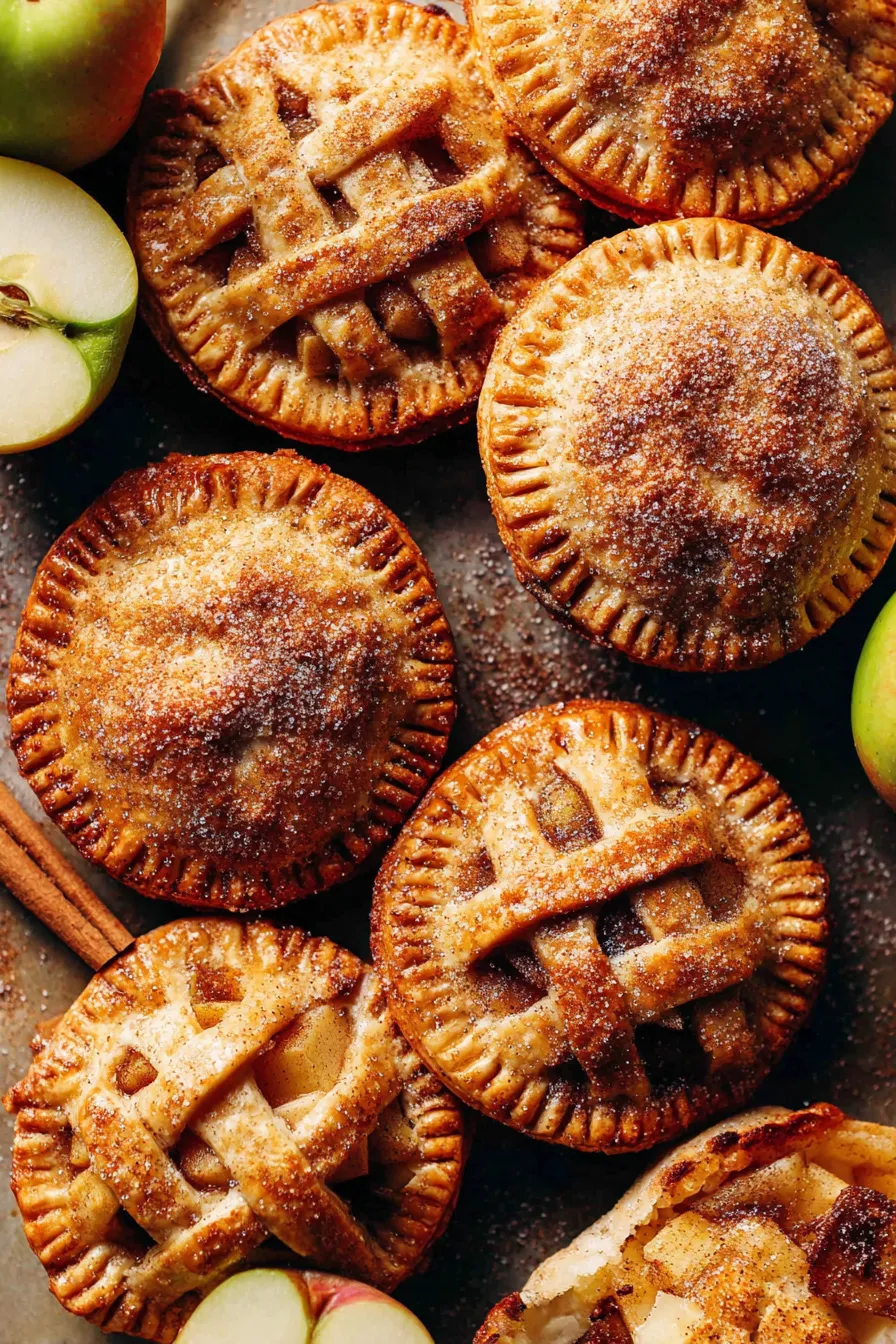
Lightly dust a surface with flour and roll one dough sheet gently to smooth. Cut apple shapes (about 8 per sheet) and refrigerate cut shapes while you finish the second sheet.

6

Fill and seal

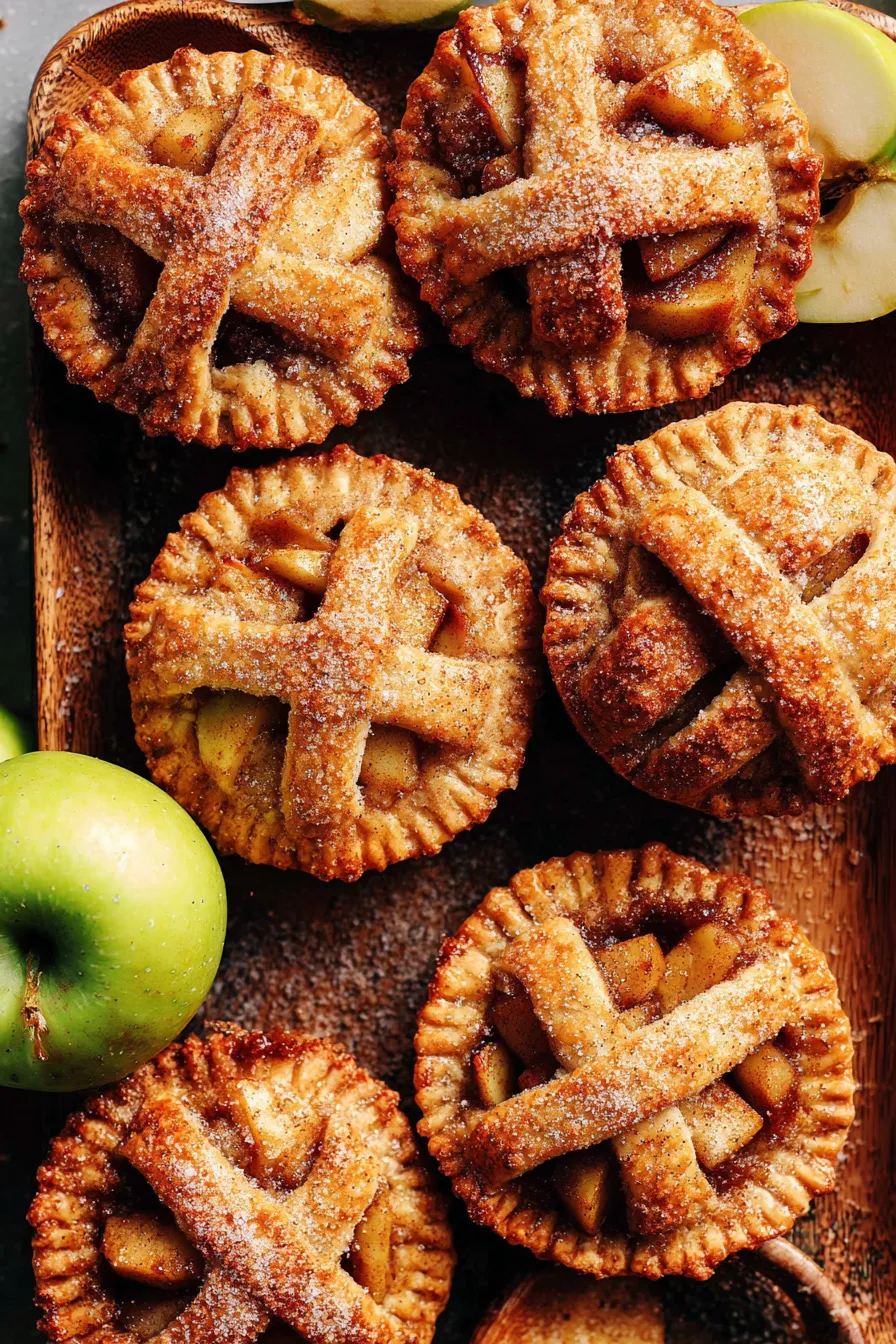
Place half the cut shapes on the sheet, spoon 1 tablespoon filling into centers, brush borders with egg wash, top with vented shapes, press seams, and crimp edges with a fork. Brush tops with egg wash.

7

Sugar and bake

Sprinkle about 1 teaspoon cinnamon sugar on each pie. Bake 12–14 minutes until golden and filling bubbles. Cool 5 minutes on the sheet then transfer to a rack.

Last Step: Please leave a rating and comment letting us know how you liked this recipe! This helps our business to thrive and continue providing free, high-quality recipes for you.

Nutrition

Calories: 210kcal | Carbohydrates: 28g | Protein:
1g | Fat: 9g | Saturated Fat: 3g |
Polyunsaturated Fat: 2g | Monounsaturated Fat:
4g | Trans Fat: 1g | Cholesterol: 253mg | Sodium:
0mg | Potassium: 953mg | Fiber: 0g | Sugar:
0g | Vitamin A: 577IU | Vitamin C: 3mg | Calcium:
47mg | Iron: 6mg

Did You Make This?

Leave a comment & rating below or tag
@paletina on social media!

Mini Apple Hand Pies

Categories:

Mini Apple Hand Pies

Did You Make This?

Leave a comment & rating below or tag @paletina on social media!

Rate This Recipe

Share This Recipe

Enjoyed this recipe? Share it with friends and family, and don't forget to leave a review!

Comments (1)

Leave a Comment

0/1000 characters
Food Lover
1 day ago

This recipe looks amazing! Can't wait to try it.

Rating:

Comments are stored locally in your browser. Server comments are displayed alongside your local comments.

Family photo

Hi, I'm Isabella!

Chef and recipe creator specializing in delicious Comfort Classics cooking. Passionate about sharing easy-to-follow recipes that bring families together around the dinner table.

30-Minute Meals!

Join to receive our email series which contains a round-up of some of our quick and easy family favorite recipes.