
Easy Sheet Pan Pierogies and Kielbasa

An effortless, family friendly sheet pan dinner with crispy pierogies, smoky kielbasa, and roasted vegetables. Ready in about 40 minutes and perfect with sour cream.
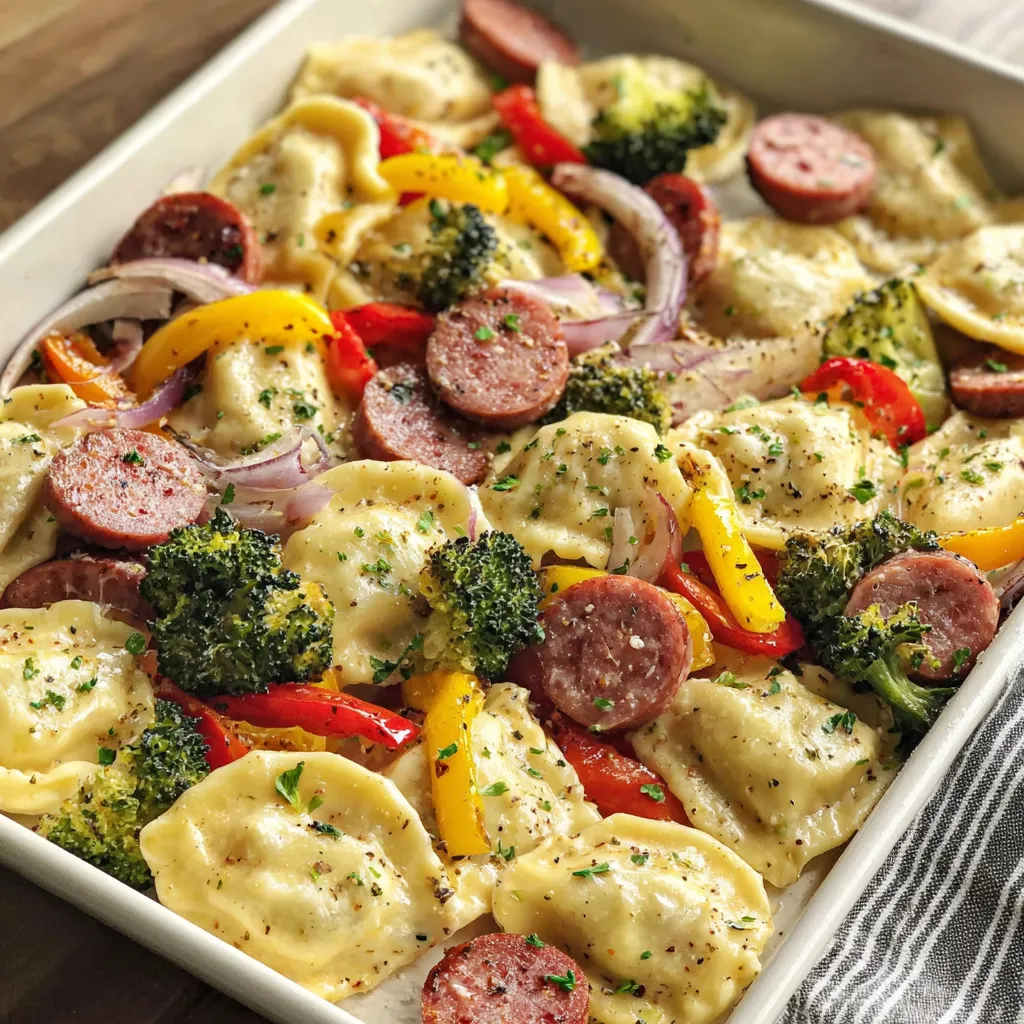
This tray dinner became my quick weeknight hero the first time I tried it on a hectic Monday when the pantry and freezer needed to be used up. I discovered the combination of frozen pierogies and kielbasa by accident while looking for a way to turn frozen dumplings into something crisp and satisfying without spending hours. The result was a golden, slightly blistered exterior on the pierogies, smoky slices of kielbasa that caramelized at the edges, and tender roasted peppers and broccoli that brought freshness and color to the plate. It is one of those meals that somehow feels indulgent and comforting while being unbelievably simple to prepare.
What makes this approach special is the balance of textures and the minimal fuss. The pierogies go from soft to crisp when roasted at a high temperature, and the kielbasa releases flavorful juices that mingle with olive oil and spices to glaze the vegetables. The whole pan roasts together so fewer dishes get dirty and the timing is forgiving. I often serve this when friends drop by because it scales easily and everyone can pick from the pan. The sour cream dipping sauce finishes each bite with a cool tang that brightens the savory flavors.
Why You'll Love This Recipe
- Ready in about 40 minutes from start to finish, making it ideal for weeknights when time is limited and hunger is not.
- Uses pantry and freezer staples: a package of frozen pierogies and kielbasa turn into a complete meal with one pan and a handful of vegetables.
- Minimal cleanup because everything roasts on a single sheet pan, so you can spend more time eating and less time washing up.
- Flexible: swap vegetables or use a different sausage to accommodate what you have on hand or dietary needs.
- Crowd friendly and shareable. It reheats well and makes a great meal for casual gatherings or family dinners.
- The crisp exterior on the pierogies and the caramelized edges on the kielbasa create satisfying contrasts in every bite.
In my family this dish became a fast favorite because even picky eaters tend to love crispy pierogies. The first time I served it at a small weekend get together, guests kept going back for seconds and remarked at how full the flavors felt even though it took so little effort. It is a recipe I reach for when I want comfort without the long prep time.
Ingredients
- Frozen pierogies, 16 ounces: Choose traditional potato and cheese pierogies for a familiar, creamy interior that crisps nicely. If you prefer a different filling, mushroom or spinach varieties also work well. Thawing is not necessary, which saves time.
- Kielbasa, 12 ounces: Use smoked kielbasa sliced into half inch pieces. The smoked flavor adds depth and the sausage renders fat that helps brown the pierogies. Look for an all pork or pork and beef blend from your trusted brand.
- Bell peppers, 1 red and 1 yellow: Chop into bite sized pieces to ensure even roasting. The sweet peppers bring color and a mild sweetness that balances the savory components.
- Onion, 1 medium: Slice into wedges or half moons so they soften and caramelize alongside the other ingredients.
- Broccoli florets, 2 cups: Trim into small, even florets so they cook through in the same time frame as the pierogies and sausage.
- Olive oil, 3 tablespoons: Use a good quality extra virgin olive oil for flavor. The oil helps the pierogies and vegetables crisp and carries the spices.
- Spice mix: 1 teaspoon garlic powder, 1 teaspoon paprika, 1/2 teaspoon onion powder, 1/2 teaspoon salt, 1/2 teaspoon black pepper. This simple blend highlights the smoked sausage without overpowering the pierogies.
- Optional finishes: 2 tablespoons melted butter or garlic butter, 2 tablespoons chopped parsley or green onions, and sour cream for serving. Butter adds richness while herbs add freshness.
Instructions
Step 1 Preheat the oven: Preheat the oven to 425°F and line a large rimmed sheet pan with parchment paper or lightly grease the surface. A hot oven is essential to get the pierogies crisp without overcooking the vegetables. Step 2 Prep the ingredients: Add the frozen pierogies, sliced kielbasa, chopped red and yellow peppers, sliced onion, and broccoli florets to a large mixing bowl. There is no need to thaw the pierogies; they will cook through while crisping on the pan. Step 3 Season everything: Drizzle the ingredients with 3 tablespoons of olive oil, then sprinkle the garlic powder, paprika, onion powder, salt, and black pepper over the top. Toss gently until everything is evenly coated. The oil and spices help the pierogies brown and the vegetables to gain color. Step 4 Arrange on the sheet pan: Spread the mixture in a single layer on the prepared sheet pan, making sure items are not stacked or crowded. Give the pierogies a little space so air can circulate and they can crisp on the outside. Step 5 Roast: Bake for 25 to 30 minutes, flipping the pierogies once about halfway through. Look for golden brown, blistered pierogies and caramelized edges on the kielbasa. If some vegetables finish earlier, remove them to avoid overcooking. Step 6 Add finishing touches: Remove the pan from the oven and, if using, drizzle the melted butter or garlic butter over the hot pierogies and sausage. Sprinkle with chopped parsley or green onions for brightness. Step 7 Serve: Serve warm straight from the sheet pan with sour cream on the side for dipping. The cool cream contrasts beautifully with the warm, savory bites.
You Must Know
- This dish reheats well in a hot oven or toaster oven for 6 to 8 minutes to restore crispness; avoid microwaving for best texture.
- It freezes well for up to 3 months when stored in an airtight container, though texture is best if frozen before adding fresh herbs or sour cream.
- High in protein from the kielbasa and satisfying carbohydrates from the pierogies, it makes a filling one pan meal.
- Adjust oven time slightly if using larger pierogies or thicker sausage slices; visual cues are golden brown pierogie edges and bubbling juices from the kielbasa.
- If you want a crisper finish, broil for 1 to 2 minutes at the end, watching closely to prevent burning.
My favorite aspect is how forgiving the method is. I have pulled the pan out early and still had delicious results, or left it a few minutes longer to achieve deep browning when entertaining. The family memories include serving this at a small reunion where everyone complimented the simple flavors and asked for the recipe by the end of the night.

Storage Tips
Cool any leftovers to room temperature for no more than two hours, then transfer to an airtight container and refrigerate for up to four days. To freeze, arrange cooled pieces in a single layer on a tray, freeze until solid, then transfer to a labeled freezer bag for up to three months. Reheat from frozen in a preheated 400°F oven for 12 to 16 minutes or from thawed for 6 to 8 minutes to restore the crisp exterior. Use oven safe containers or a baking sheet for reheating to bring back texture.
Ingredient Substitutions
If you do not have kielbasa, use smoked sausage, chorizo, or even sliced chicken sausage. For a vegetarian option, substitute with plant based smoked sausage and choose cheese filled pierogies or mushroom filled dumplings. Swap broccoli for cauliflower or asparagus depending on seasonality, and use sweet potatoes in place of pierogies for a lower carb variant, adjusting roast time until tender. When swapping, keep similar piece sizes to ensure even cooking.
Serving Suggestions
Serve family style on the sheet pan with small bowls of sour cream, whole grain mustard, or a quick herbed yogurt for dipping. Pair with a simple green salad dressed in lemon vinaigrette to cut through the richness. For a heartier meal, add roasted Brussels sprouts or a side of braised red cabbage. Garnish with chopped parsley or sliced green onions to add freshness and color before serving.
Cultural Background
Pierogies are a beloved dumpling with roots in Central and Eastern Europe, particularly Poland, where they are known as pierogi. Traditionally filled with potato and cheese, they appear in many holiday and family meals. Pairing these dumplings with kielbasa, a classic Eastern European smoked sausage, creates a modern take on familiar flavors. Roasting everything together on one pan is an American convenience adaptation that keeps tradition while simplifying preparation for busy households.
Seasonal Adaptations
In spring, introduce snap peas and ramps for freshness. In summer, use heirloom peppers and add a quick char on the grill before finishing in the oven. For fall and winter, swap in roasted root vegetables like parsnips and butternut squash to add seasonal sweetness. You can also add a splash of apple cider vinegar to the finishing butter for a touch of acidity that complements autumn flavors.
Meal Prep Tips
For meal prep, roast a double batch and portion into individual containers for grab and go lunches or dinners. Keep the sour cream and fresh herbs separate until serving to maintain texture. Label containers with the date and plan to consume refrigerated portions within four days. Reheat in the oven rather than the microwave to keep pierogies crisp. This approach saves time and provides satisfying meals all week.
Whether you are feeding family or hosting friends, this sheet pan combination delivers satisfying texture, bold flavor, and minimal cleanup. Give it a try on a busy night and then make it again with small variations to keep it fresh and new.
Pro Tips
Roast at a high temperature 425°F to crisp the pierogies without steaming the vegetables.
Toss ingredients gently in oil and spices to avoid tearing frozen pierogies.
Flip the pierogies once halfway through to ensure even browning on both sides.
If vegetables are cut larger, remove earlier to prevent overcooking and keep pierogies on the pan a bit longer.
Broil for a minute at the end for extra color but watch closely to prevent burning.
This nourishing easy sheet pan pierogies and kielbasa recipe is sure to be a staple in your kitchen. Enjoy every moist, high protein slice — it is perfect for breakfast or as a wholesome snack any time.
Tags
Easy Sheet Pan Pierogies and Kielbasa
This Easy Sheet Pan Pierogies and Kielbasa recipe makes perfectly juicy, tender, and flavorful steak every time! Serve with potatoes and a side salad for an unforgettable dinner in under 30 minutes.
Ingredients
Main
Seasoning
Optional finishes
Instructions
Preheat the oven
Preheat the oven to 425°F and prepare a large rimmed sheet pan with parchment paper or a light coating of oil. A properly preheated oven helps the pierogies crisp quickly.
Prep the ingredients
Combine the frozen pierogies, sliced kielbasa, chopped bell peppers, sliced onion, and broccoli florets in a large mixing bowl. Keep pieces uniform in size for even roasting.
Season everything
Drizzle 3 tablespoons of olive oil over the mixture, then add garlic powder, paprika, onion powder, salt, and black pepper. Gently toss until evenly coated and the spices distribute over the pierogies and vegetables.
Arrange on the sheet pan
Spread the tossed ingredients into a single layer on the prepared sheet pan so nothing is stacked. Air circulation around each piece is key to achieving a crisp exterior.
Roast
Bake for 25 to 30 minutes, flipping the pierogies once at the halfway point. Look for golden brown pierogies and caramelized edges on the kielbasa and vegetables. Adjust time if your oven runs hot or if components are larger.
Add finishing touches and serve
Remove the pan from the oven and drizzle with 2 tablespoons melted butter if desired, then sprinkle with chopped parsley or green onions. Serve warm with sour cream for dipping.
Last Step: Please leave a rating and comment letting us know how you liked this recipe! This helps our business to thrive and continue providing free, high-quality recipes for you.
Nutrition
Did You Make This?
Leave a comment & rating below or tag
@paletina on social media!
Categories:
You might also like...

Chocolate Chunk Marshmallow Brownies
Ultra-fudgy brownies packed with chocolate chunks, crowned with gooey marshmallows and glossed with warm chocolate frosting for a decadent crowd-pleaser.

Buttery Pecan Pie Bars
Buttery shortbread crust topped with a gooey brown sugar-pecan filling. Ten minutes to prep, irresistibly crunchy edges, and perfect for make-ahead treats.

Creamy Pumpkin Cheesecake
Silky, crack-free pumpkin cheesecake with warm spice, buttery graham crust, and make-ahead convenience for showstopping holiday dinners.
Did You Make This?
Leave a comment & rating below or tag @paletina on social media!
Rate This Recipe
Share This Recipe
Enjoyed this recipe? Share it with friends and family, and don't forget to leave a review!
Comments (1)
This recipe looks amazing! Can't wait to try it.
Comments are stored locally in your browser. Server comments are displayed alongside your local comments.

Hi, I'm Isabella!
What's Popular

30-Minute Meals!
Join to receive our email series which contains a round-up of some of our quick and easy family favorite recipes.