
>>

Buttery caramel layered between crisp crackers, finished with a chocolate-butterscotch-peanut butter topping—an easy, nostalgic no-bake treat everyone asks for.
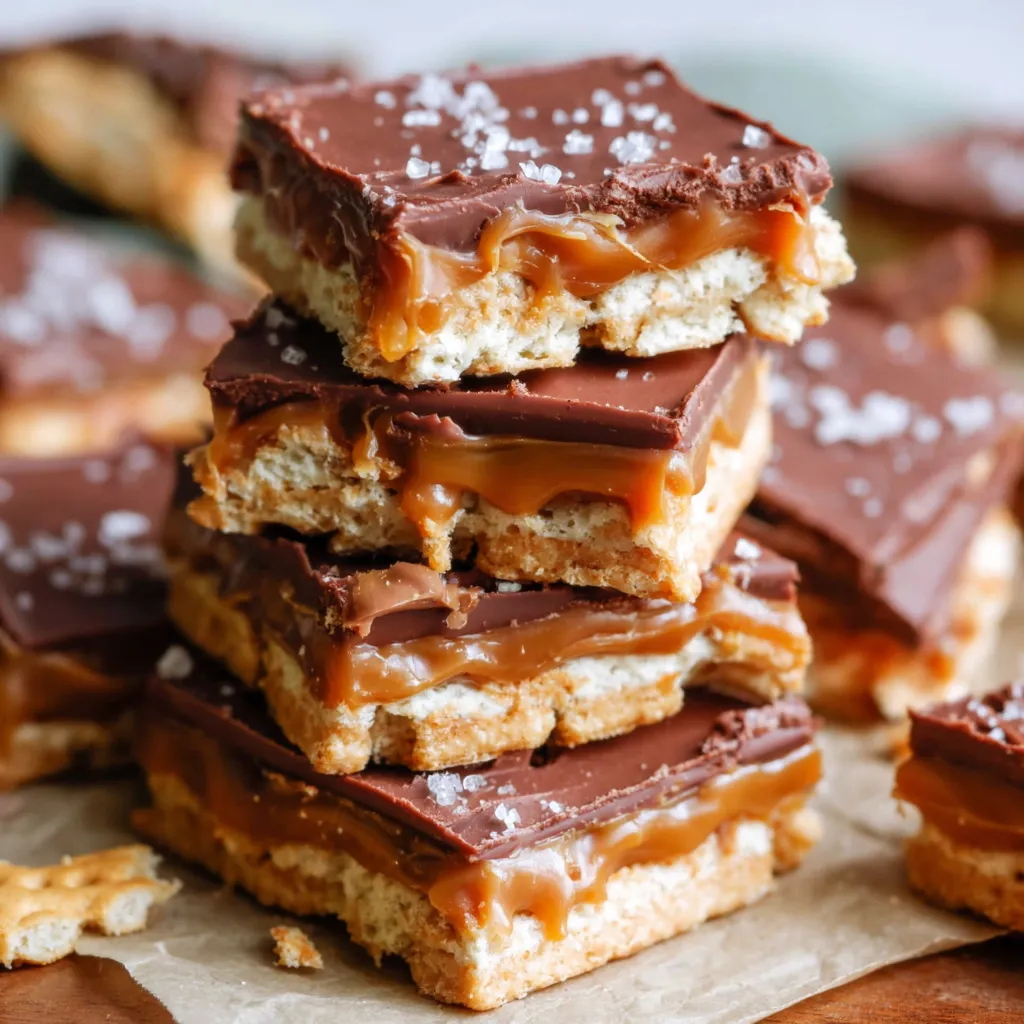
This tray of caramel cracker bars has been my answer to potlucks, last-minute bake sales, and quiet Saturday afternoons when I want something sweet but unfussy. I first learned this method from a friend who brought a pan of these to a neighborhood gathering years ago; the combination of crisp, salty crackers and soft, buttery caramel topped with a glossy chocolate-and-butterscotch coating was unforgettable. The texture contrast—snap of the cracker, chew of the caramel, and the creamy top—makes every bite interesting. It also reminds me of afternoons in my grandmother's kitchen, when we chopped treats into generous squares and wrapped them to give away.
What makes this version special is the little extra step of crushed graham in the caramel, which gives the caramel a rounded flavor and helps it set with just the right chew. I prefer to use a straight-sided 9x13 pan because the crackers lay out in tidy rows and the bars cut into neat rectangles. When you follow the technique for boiling the caramel and spreading the layers, you get consistently clean layers and bars that hold together without crumbling. This is an approachable, crowd-pleasing dessert that’s equal parts nostalgic and irresistible.
My family always reacts the same way: within minutes of placing the pan on the table, someone asks for the recipe. The first time I brought these to a holiday snack exchange, a neighbor declared them the best sweet on the table. Over time I’ve learned a few small tricks—lining the pan with parchment for easy removal and using evaporated milk for a stable, glossy caramel—that keep the results consistent and reduce melting or runniness in warmer kitchens.
One of my favorite aspects of these bars is their portability: they travel well, stack neatly, and make a thoughtful neighbor gift. I remember taking a tin of them to a friend after she had a baby; the bars were a quick energy boost and a small celebration that felt homemade and personal. The combination of textures and flavors sparks that same delight in guests every time.
Place the bars in a single layer in an airtight container and refrigerate for up to five days. If stacking is necessary, separate layers with parchment or wax paper to prevent sticking. For longer storage, wrap the cooled slab tightly in plastic wrap and foil before freezing; thaw overnight in the refrigerator to minimize condensation. When ready to serve, bring bars to room temperature for about 15 to 30 minutes for the best balance of firm topping and tender caramel.
If you have dietary needs or limited pantry options, there are easy swaps. Replace the club crackers with gluten-free crackers if necessary, though the texture will differ slightly. Swap butterscotch chips for additional milk chocolate for a simpler chocolate-only top, or use dark chocolate for a less sweet contrast. For a nut-free version, omit the peanut butter and use 1 tablespoon of neutral oil to help melt the chips smoothly. Note that natural peanut butters that separate can make the topping grainy, so choose a stable creamy variety.
Cut into rectangles and serve on a platter lined with parchment for casual gatherings, or package in decorative boxes for gifting. These bars pair well with strong coffee or a glass of cold milk. For a festive display, sprinkle a pinch of flaky sea salt on the melted topping before it sets, or finely chop pecans and press them into the topping for added crunch. They are excellent alongside other small bites like salted pretzels or simple sugar cookies.
This layered bar style traces its roots to American backyard potlucks and holiday cookie exchanges where simple, no-fuss sweets became popular for their ease and portability. The technique of layering crackers or cookies with sticky caramel and a chocolate top is a descendant of classic candy-making traditions where boiling sugar and butter created lasting confections. Variations have appeared in regional cookbooks and church sale tables for decades, often tailored by whatever chips or nuts were on hand.
For autumn, swap in pumpkin spice graham crumbs or add a teaspoon of cinnamon to the caramel. For winter holidays, stir a pinch of orange zest into the melted topping or use peppermint pieces sprinkled on top. In summer, lighten the topping with white chocolate and stir in toasted coconut for a tropical note. Adjust the toppings to match seasonal flavors without altering the basic, reliable assembly method.
Make the caramel and assemble the slab the day before you need it; this gives the bars time to fully set and makes slicing neater. If preparing for a week of snacks, cut into individual portions and store each bar in parchment or wax paper to make grabbing a single portion easy. When transporting, place them in a shallow, rigid container to avoid shifting and protect the glossy top.
These bars are simple, dependable, and always a welcome treat. Experiment with small changes to suit your pantry and taste, but keep the core technique—boiling a stable caramel, layering crackers, and finishing with a smooth topping—for consistent success. Enjoy the process and the people who will smile when you bring them out.
Line the pan with parchment leaving an overhang for easy removal and cleaner cuts.
Stir constantly during the 7-minute boil to prevent burning and ensure a smooth caramel.
Warm and dry your knife between cuts for clean slices of the glossy topping.
Use evaporated milk rather than fresh milk for a more stable and chewy caramel set.
This nourishing caramel cracker bars recipe is sure to be a staple in your kitchen. Enjoy every moist, high protein slice — it is perfect for breakfast or as a wholesome snack any time.
Use a heavy-bottomed saucepan and stir constantly while boiling the caramel to avoid scorching and grainy texture.
Yes, they freeze well for up to 3 months if wrapped tightly and thawed in the refrigerator.
This Caramel Cracker Bars recipe makes perfectly juicy, tender, and flavorful steak every time! Serve with potatoes and a side salad for an unforgettable dinner in under 30 minutes.
Line a 9x13 inch pan with parchment, allowing ends to overhang. Arrange the first layer of club crackers (approximately 27) in 3 rows of 9 if using straight sides.
In a large heavy-bottomed saucepan, combine butter, crushed graham, brown sugar, and evaporated milk. Bring to a boil over medium heat, stir constantly, and boil for 7 minutes. Remove from heat and stir in vanilla.
Pour half the caramel over the first cracker layer, spread gently, add a second cracker layer, pour remaining caramel, and top with the final cracker layer. Press lightly to ensure contact.
In a microwave-safe bowl, combine chocolate chips, butterscotch chips, and peanut butter. Microwave for 1 minute, stir, then add 10-second bursts until smooth. Pour over the top layer and spread evenly.
Refrigerate until firm, at least 2 hours. Use the parchment overhang to lift the slab from the pan and cut into bars with a sharp knife, warming the knife between cuts for clean slices.
Last Step: Please leave a rating and comment letting us know how you liked this recipe! This helps our business to thrive and continue providing free, high-quality recipes for you.
Leave a comment & rating below or tag
@paletina on social media!

Ultra-fudgy brownies packed with chocolate chunks, crowned with gooey marshmallows and glossed with warm chocolate frosting for a decadent crowd-pleaser.

Buttery shortbread crust topped with a gooey brown sugar-pecan filling. Ten minutes to prep, irresistibly crunchy edges, and perfect for make-ahead treats.

Silky, crack-free pumpkin cheesecake with warm spice, buttery graham crust, and make-ahead convenience for showstopping holiday dinners.
Leave a comment & rating below or tag @paletina on social media!
Enjoyed this recipe? Share it with friends and family, and don't forget to leave a review!
This recipe looks amazing! Can't wait to try it.
Comments are stored locally in your browser. Server comments are displayed alongside your local comments.

Join to receive our email series which contains a round-up of some of our quick and easy family favorite recipes.
