
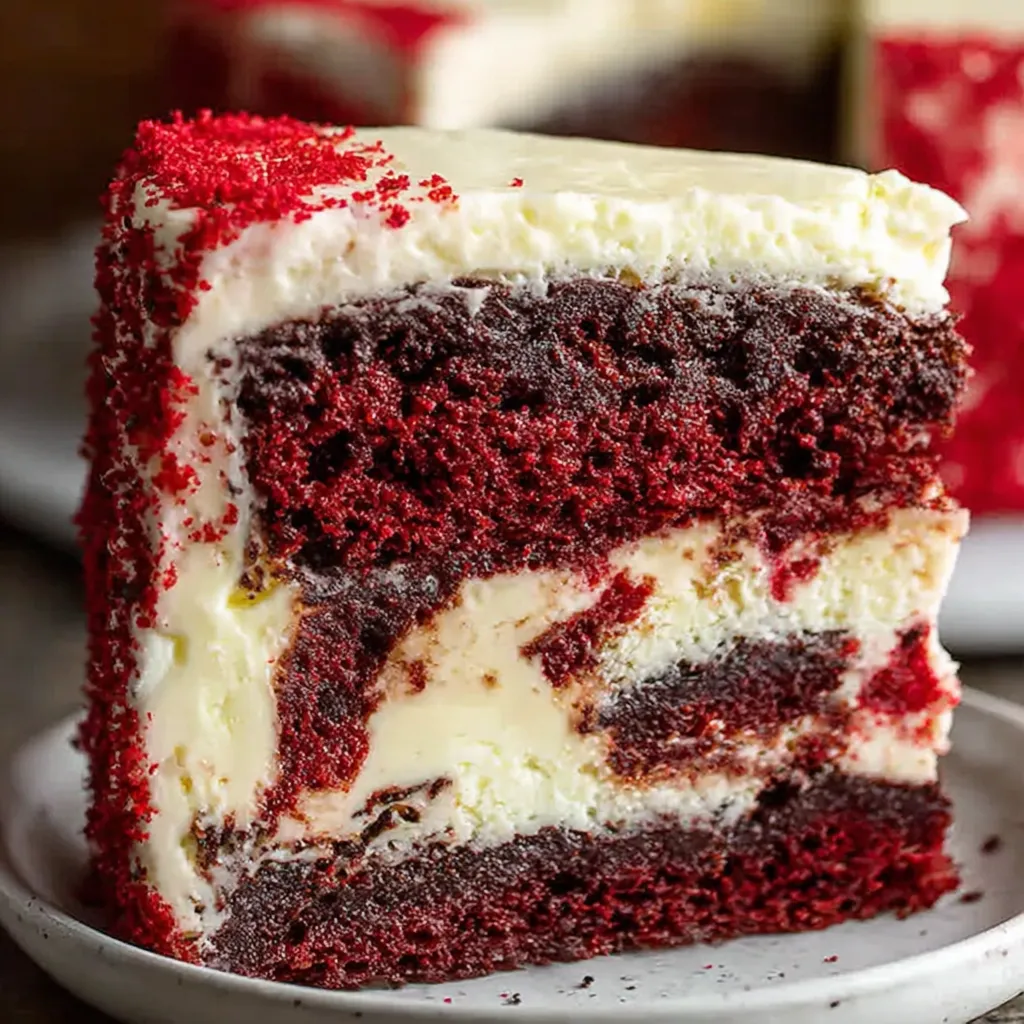
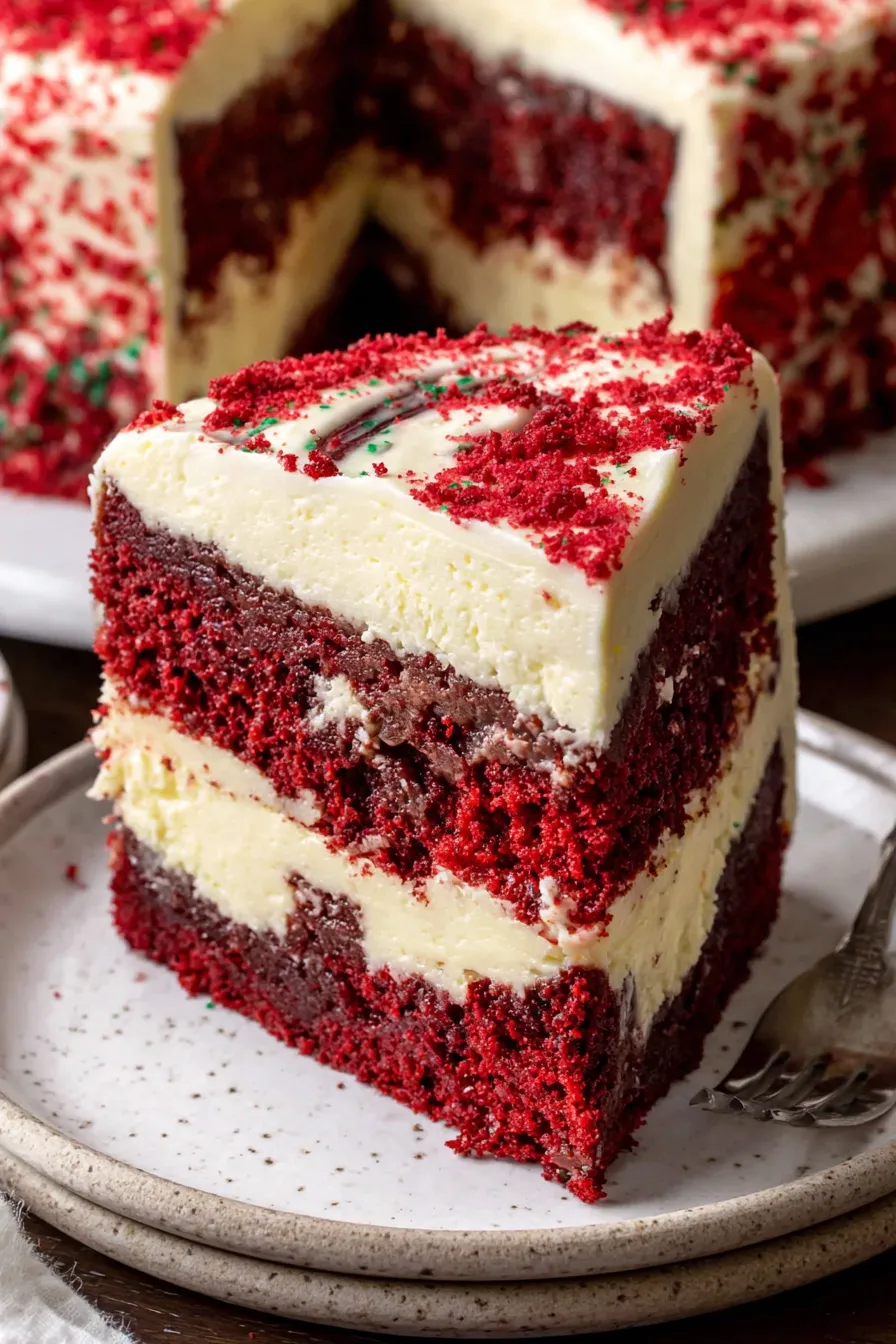
Red Velvet Cheesecake Cake

A festive layered dessert that combines tangy cream cheese filling with moist red velvet layers and silky cream cheese frosting — perfect for celebrations.
Why You'll Love This Recipe
- This dessert brings three textures together: moist cocoa-scented layers, a dense yet silky cheesecake insert, and a smooth cream cheese finish that’s not overly sweet.
- It uses pantry-friendly ingredients and simple techniques — most items are likely already in your kitchen, and assembly is done in one 9×9-inch pan for easy cleanup.
- Make-ahead friendly: you can bake the cake a day in advance and frost it the next day for fresher presentation and easier slicing.
- Suitable for celebrations — the red color and riched center make it look like a specialty pastry while still being approachable for home cooks.
- Flexible with dairy choices: while the classic version uses cream cheese and sour cream, I note alternatives for lighter or tangier results below.
- Ready in about 1 hour from start to finish, including baking and basic cooling time, so it’s practical for weeknight treats or weekend hosting.
I’ve learned over many bakes to trust visual cues: the cheesecake layer should be set but not cracked, the cake edges pull slightly away from the pan, and the frosting should look glossy and spreadable. My family’s reaction the first time I served this was pure delight — my nephew declared it "the best cake ever," and that’s stuck ever since. I often tweak spice or cocoa levels depending on the season, but the core method remains the same because it reliably delivers a beautiful slice every time.
Ingredients
- Cheesecake layer: 12 ounces cream cheese at room temperature, beaten smooth. Full-fat cream cheese gives the best texture and flavor; avoid low-fat varieties for a denser, silkier filling.
- All-purpose flour: 3 cups for the cake and 1 tablespoon in the cheesecake. Use spoon-and-level method for accurate measuring; King Arthur or other reliable brands perform consistently.
- Unsweetened cocoa powder: 1/4 cup (Dutch-process recommended) for the deep red velvet flavor and muted chocolate background; Dutch-process deepens color and flavor.
- Fats and dairy: 1 cup neutral oil (canola or vegetable), 3/4 cup sour cream or Greek yogurt, 1 cup buttermilk. These liquid fats and cultured dairy keep the crumb tender and add tang.
- Sugars and leaveners: 1 1/2 cups granulated sugar for the batter and 1/4 cup sugar in the filling; 2 teaspoons baking powder and 1 teaspoon baking soda help the cake rise just enough without becoming cake-poppy.
- Eggs & flavor: 4 large eggs total (1 in the filling, 3 in the batter), 1 teaspoon pure vanilla extract in both filling and frosting, 1 teaspoon white vinegar to react with baking soda and brighten the crumb.
- Color and finishing: 1 teaspoon red gel food coloring for classic color; for frosting, 4 ounces cream cheese plus 1 cup (8 ounces) unsalted butter, 3 cups sifted powdered sugar for a stable, silky finish.
Instructions
Prepare the cheesecake layer: In a small bowl, use a hand mixer to beat 12 ounces room-temperature cream cheese with 1/4 cup granulated sugar on high speed for 1 minute until very smooth. Add 1 tablespoon all-purpose flour and 1 teaspoon vanilla extract; mix on medium until combined. Add 1 large room-temperature egg and mix on low speed just until incorporated to avoid adding air. The filling should be dense and pourable — set aside while you prepare the batter. Preheat oven and prepare pan: Heat the oven to 350°F. Lightly spray a 9×9-inch baking pan with baking spray, line the bottom with parchment trimmed to fit, and spray the parchment again for an easy release. This double layer prevents sticking and helps lift the cake cleanly when cooled. Mix dry ingredients: In a medium bowl whisk together 3 cups all-purpose flour, 1/4 cup unsweetened cocoa powder, 2 teaspoons baking powder, 1 teaspoon baking soda, and 1 teaspoon salt until uniform. Whisking incorporates air and breaks up clumps in the cocoa for an even crumb. Combine wet ingredients: In a large bowl, whisk 1 cup oil with 1 1/2 cups granulated sugar, 1 teaspoon white vinegar, 3 large room-temperature eggs, 3/4 cup sour cream (or Greek yogurt), 1 cup buttermilk, and 1 teaspoon red gel food coloring until smooth and uniform. The acid from vinegar and buttermilk brightens flavor and reacts with leaveners for lift. Incorporate dry into wet: Gently fold the dry mixture into the wet with a rubber spatula until just combined. Overmixing develops gluten and yields a tougher crumb; stop when streaks disappear and batter is homogenous. Layer and assemble: Spoon half of the red velvet batter into the prepared pan and spread evenly. Dollop the cheesecake mixture over the red batter using a spoon or cookie scoop; use an offset spatula to gently spread it into an even layer. Carefully top with remaining red velvet batter and smooth the surface. Aim for even layers to ensure a clean slice. Bake and test: Bake for 30–35 minutes at 350°F. Insert a toothpick into the center—if it comes out clean (no wet batter), it’s done. The cheesecake layer should be set with only a slight wobble at the center; avoid overbaking to prevent cracks. Cool completely: Allow the pan to rest on a wire rack for 10 minutes, then lift the cake by the parchment and transfer to the rack to cool completely before frosting. Cooling fully prevents the frosting from sliding and helps flavors settle. Make the frosting: Sift 3 cups powdered sugar. Beat 1 cup (8 ounces) unsalted butter on high for 2 minutes until pale and fluffy. Add 4 ounces room-temperature cream cheese and beat on high for another minute. Gradually add sifted sugar on medium until combined, then add 1 teaspoon vanilla and beat on high until smooth and spreadable. Frost and decorate: Spread the frosting over the cooled cake with an offset spatula. For a festive touch, top with holiday sprinkles or chocolate shavings. Chill briefly to set before slicing for clean edges.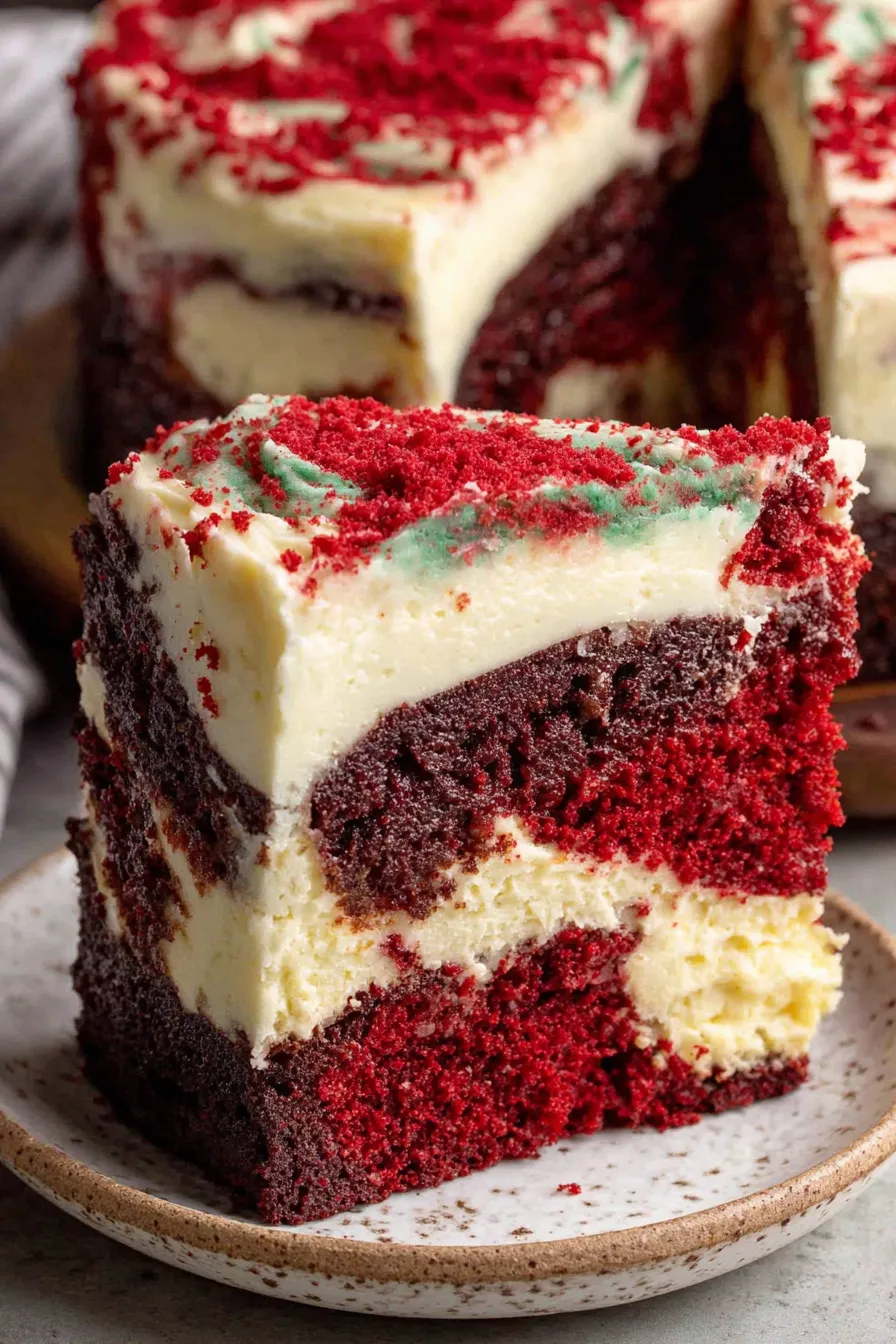
You Must Know
- This dessert keeps well in the refrigerator for up to 4 days when tightly wrapped or stored in an airtight container.
- It freezes beautifully for up to 3 months — wrap slices in plastic, then foil; thaw overnight in the fridge before serving.
- High in protein and calcium compared to many cakes thanks to the cream cheese and buttermilk, but it’s also calorie-dense — slice moderately for balanced portions.
- Use room-temperature ingredients for even emulsification; cold eggs or dairy can create a lumpy batter and uneven bake.
One of my favorite aspects is the reveal when you cut into the cake: the bright red crumb framing the pale cheesecake layer always gets appreciative gasps. At a family gathering, someone once called our cake the "fancy one," and that’s exactly the feeling I want — an approachable dessert that reads special. I enjoy tweaking the cocoa level and sometimes adding a hint of espresso powder to deepen the chocolate notes without changing the texture.
Storage Tips
Store the cake covered in the refrigerator for up to 4 days. Keep it in a cake carrier or wrap the pan with a domed lid or plastic wrap to protect the frosting. For longer storage, slice and freeze single portions: wrap each piece in plastic wrap, then foil, and place in a labeled freezer bag for up to 3 months. Thaw overnight in the fridge for best texture. Reheat gently at room temperature for 30–60 minutes before serving to let flavors open up. Avoid leaving the frosted cake at room temperature for more than two hours due to the cream cheese.
Ingredient Substitutions
If you want a lighter version, swap half the oil for unsweetened applesauce (1:1 ratio) to reduce fat while maintaining moisture. Greek yogurt can replace sour cream at a 1:1 ratio; it adds tang and structure. For a dairy-free adaptation, use plant-based cream cheese and butter substitutes and full-fat coconut yogurt as a sour cream alternative, though texture will be slightly different. If you prefer a deeper chocolate flavor, add 1 teaspoon espresso powder dissolved in the buttermilk; it intensifies cocoa without tasting like coffee.
Serving Suggestions
Serve slices with a dollop of lightly whipped cream or a spoonful of mascarpone for extra richness. Fresh berries and a dusting of cocoa make elegant accompaniments, while a drizzle of dark chocolate sauce adds an indulgent touch. For a party, plate small squares alongside coffee or dessert wine — the cream cheese frosting pairs superbly with robust black coffee or a late-harvest Riesling. Garnish with festive sprinkles or chocolate curls for seasonal flair.
Cultural Background
Red velvet has roots in American baking traditions, gaining popularity for its distinctive color and tender texture achieved by the reaction of cocoa, acid, and buttermilk. The cheesecake layer nods to European and New York-style cheesecakes — dense, tangy, and rich. Combining the two reflects modern baking’s love of hybrid desserts: layered cakes that offer a theater of flavors and textures at once. This mash-up has become a staple at celebrations where familiar flavors with a twist are appreciated.
Seasonal Adaptations
In winter, add warm spices like 1/2 teaspoon cinnamon and a pinch of nutmeg to the batter for holiday warmth. For spring, fold fresh raspberries into the frosting or top slices with macerated strawberries for brightness. For a summer BBQ, lighten frosting by reducing sugar by 1/2 cup and adding zest from one orange to cut richness. These small seasonal shifts keep the core dessert recognizable while adapting to local produce and occasions.
Meal Prep Tips
To streamline, bake the cake the day before serving and keep it covered in the refrigerator. Make the frosting the morning of serving for the freshest look and texture; refrigerated frosting can be whipped briefly to regain spreadability. For portable portions, cut into squares, place in single-serve containers, and stack with parchment layers. Label and date frozen servings to rotate through events and reduce waste. Timing-wise, allow at least 2 hours of cooling time before frosting for clean slices.
This cake has earned a permanent spot in my celebration repertoire because it’s both showstopping and reliably delicious. I hope you enjoy the process of making it and the smiles that follow when you serve it to friends and family.
Pro Tips
Always use room-temperature cream cheese and eggs to ensure a smooth, lump-free cheesecake layer.
Sift powdered sugar for the frosting to prevent gritty texture and to achieve a silky finish.
Don’t overmix the cake batter; fold until just combined to keep the crumb tender.
Cool completely before frosting to prevent melting and sliding.
This nourishing red velvet cheesecake cake recipe is sure to be a staple in your kitchen. Enjoy every moist, high protein slice — it is perfect for breakfast or as a wholesome snack any time.
FAQs about Recipes
How long does the cake keep?
Yes — store wrapped in plastic or an airtight container in the fridge for up to 4 days, or freeze slices for up to 3 months.
How can I avoid cracks in the cheesecake layer?
Use room-temperature ingredients and avoid overmixing. Bake until a toothpick in the center comes out clean and the cheesecake layer is set with slight wobble.
Tags
Red Velvet Cheesecake Cake
This Red Velvet Cheesecake Cake recipe makes perfectly juicy, tender, and flavorful steak every time! Serve with potatoes and a side salad for an unforgettable dinner in under 30 minutes.
Ingredients
Cheesecake Layer
Red Velvet Cake
Cream Cheese Frosting
Instructions
Prepare the cheesecake layer
Beat cream cheese and sugar until smooth, add flour and vanilla, then the egg and mix until just combined. Set aside.
Preheat oven and prepare pan
Preheat to 350°F. Spray a 9x9 pan, line with parchment, and spray again to ensure easy release.
Mix dry ingredients
Whisk flour, cocoa, baking powder, baking soda, and salt until combined and aerated.
Combine wet ingredients
Whisk oil, sugar, vinegar, eggs, sour cream, buttermilk, and red food coloring until smooth.
Incorporate dry ingredients
Fold dry into wet with a spatula until just combined, avoiding overmixing to keep the crumb tender.
Layer the batter
Spread half the batter in the pan, dollop cheesecake over it and spread gently, then top with remaining batter.
Bake the cake
Bake at 350°F for 30–35 minutes until a toothpick comes out clean and cheesecake is set with slight wobble.
Cool and frost
Cool 10 minutes in the pan, transfer to a rack to cool completely. Make frosting and spread over the cooled cake.
Last Step: Please leave a rating and comment letting us know how you liked this recipe! This helps our business to thrive and continue providing free, high-quality recipes for you.
Nutrition
Did You Make This?
Leave a comment & rating below or tag
@paletina on social media!
Categories:
You might also like...

Chocolate Chunk Marshmallow Brownies
Ultra-fudgy brownies packed with chocolate chunks, crowned with gooey marshmallows and glossed with warm chocolate frosting for a decadent crowd-pleaser.

Buttery Pecan Pie Bars
Buttery shortbread crust topped with a gooey brown sugar-pecan filling. Ten minutes to prep, irresistibly crunchy edges, and perfect for make-ahead treats.

Creamy Pumpkin Cheesecake
Silky, crack-free pumpkin cheesecake with warm spice, buttery graham crust, and make-ahead convenience for showstopping holiday dinners.
Did You Make This?
Leave a comment & rating below or tag @paletina on social media!
Rate This Recipe
Share This Recipe
Enjoyed this recipe? Share it with friends and family, and don't forget to leave a review!
Comments (1)
This recipe looks amazing! Can't wait to try it.
Comments are stored locally in your browser. Server comments are displayed alongside your local comments.

Hi, I'm Isabella!
What's Popular

30-Minute Meals!
Join to receive our email series which contains a round-up of some of our quick and easy family favorite recipes.