
Panko Chicken

Crispy, golden panko-coated chicken cutlets baked to juicy perfection—an easy weeknight favorite that delivers crunch and flavor without the fuss.
This recipe for panko chicken has been a weeknight lifesaver at my house ever since I first tested it on a rainy Tuesday when the pantry was light and patience was lower than usual. The goal was simple: make a crunchy, restaurant-style cutlet without standing over a pan of oil. What emerged was a crisp exterior that holds its crunch after baking and a tender, juicy interior that the whole family loved. I discovered early on that coating the panko with a little olive oil and folding in grated Parmesan created golden browning and savory depth without deep frying.
I remember serving this the night my teenager had a last-minute friend over and worrying it would be too plain. Instead, the plates came back clean and there were requests for the recipe. The texture contrast is the star here: the toasted panko provides a light shatter while the chicken stays moist because the cutlets are thin and bake quickly. It is versatile, reliable, and approachable for cooks of any skill level—perfect for busy nights, casual dinners, or when you want comfort without complicated steps.
Why You'll Love This Recipe
- Ready in about 35 minutes from start to finish, including simple prep and a 18 to 22 minute bake time that keeps the interior juicy while achieving a crisp crust.
- Uses pantry-friendly staples like all-purpose flour, eggs, panko breadcrumbs, and grated Parmesan so you can make it on short notice.
- Olive oil mixed into the breadcrumbs promotes even browning in the oven, giving you deep golden color without frying in a skillet or deep fryer.
- Very adaptable: swap spices, use an air fryer, or turn it into an easy baked parmesan chicken with marinara and mozzarella for a quick family dinner upgrade.
- Works well for meal prep; cooked cutlets reheat beautifully and stay crisp if stored and reheated properly, making them great for packed lunches or quick dinners.
When I first taught this to my sister she loved that the dredging station is forgiving and that the panko stays crunchy even on reheating when you follow the brief resting and storage tips. It’s become the go-to for guests because it feels a bit indulgent while remaining surprisingly light and balanced.
Ingredients
- All-purpose flour: Use 1/2 cup to dry-dust the cutlets. A light flour layer helps the egg adhere and creates a foundation for the panko. Any standard brand will work.
- Seasonings: 1 teaspoon garlic powder, 1 teaspoon onion powder, 1 teaspoon salt, 1/2 teaspoon black pepper. These bring savory backbone to the crust; adjust salt to taste if using salted Parmesan.
- Eggs: 2 large eggs at room temperature. Beating them well creates a uniform binder that ensures the panko sticks and forms an even shell.
- Panko breadcrumbs: 1 1/4 cups plain panko for maximum crunch. Japanese-style panko has a larger flake and crisps more effectively than ordinary fine breadcrumbs.
- Grated Parmesan: 1/2 cup finely grated Parmesan cheese. Adds a salty, umami-rich note that helps the crust brown and taste balanced.
- Olive oil: 3 tablespoons to moisten the panko. This small amount promotes crisping and even coloring in the oven without greasiness.
- Chicken: 4 boneless skinless chicken breast cutlets, totaling about 1 1/4 to 1 1/2 pounds and pounded or sliced to roughly 3/4-inch thickness. Uniform thickness ensures even cooking.
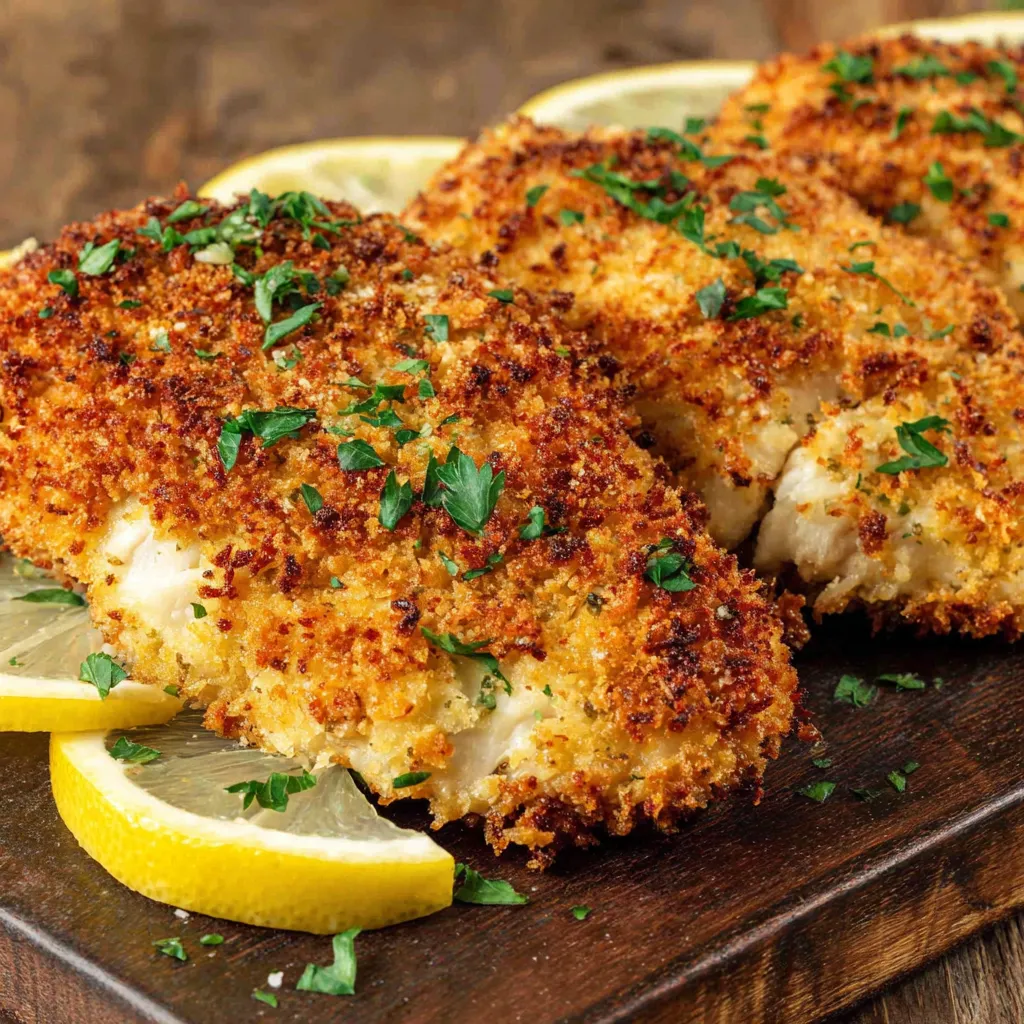
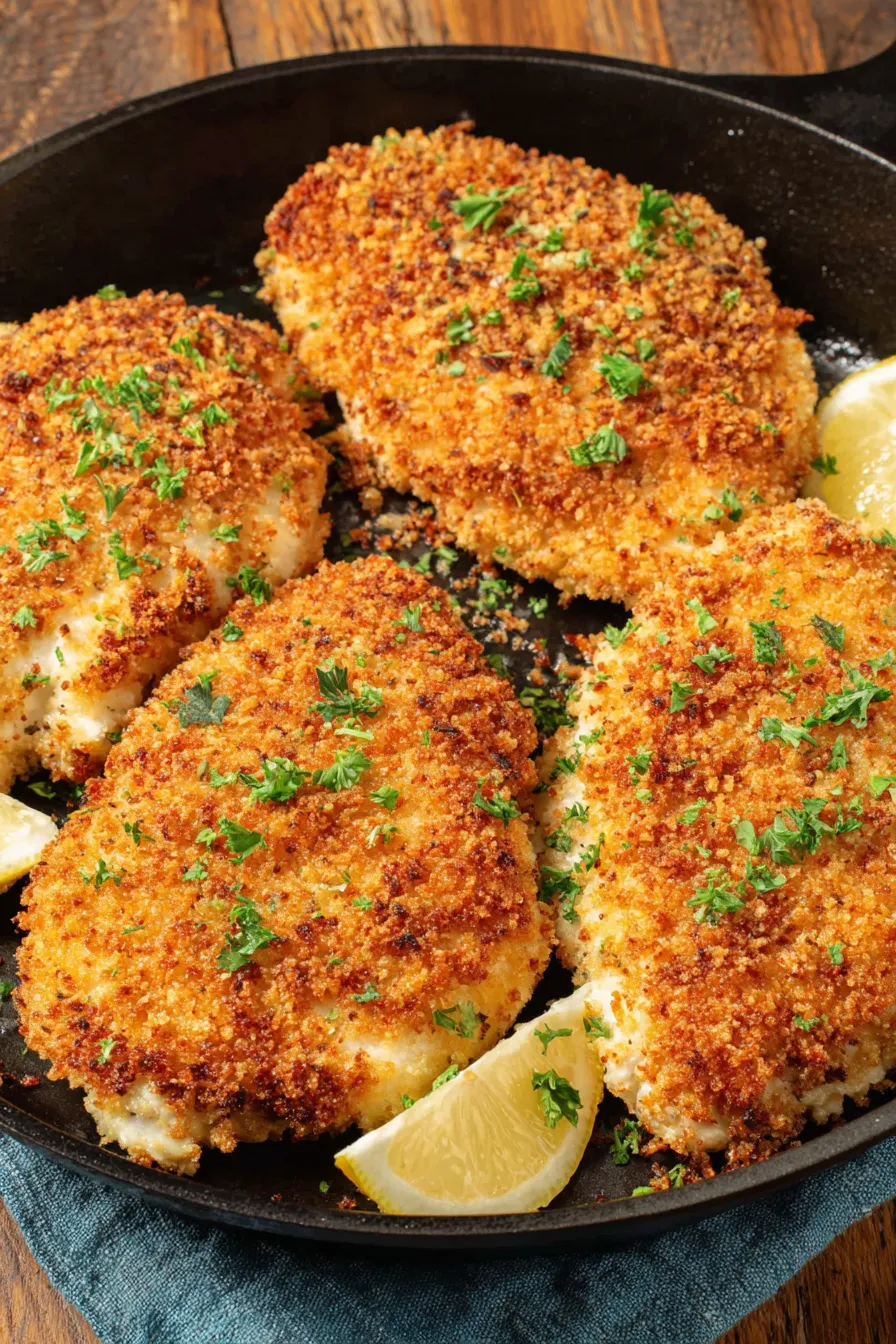
- Garnish: Fresh chopped parsley and lemon wedges (optional) for brightness and presentation when serving.
Instructions
Step 1 — Preheat and prepare: Preheat the oven to 425 degrees Fahrenheit and line a rimmed baking tray with aluminum foil. Position the rack in the middle of the oven so the heat circulates evenly. Lining the tray makes cleanup simple and reflects heat for consistent browning. If your cutlets vary in size, weigh or visually group them so similar pieces bake together. Step 2 — Set up the dredging station: Arrange three shallow dishes slightly larger than your cutlets. In the first dish mix the flour with garlic powder, onion powder, salt, and black pepper. In the second dish beat the eggs until uniform. In the third dish combine panko, grated Parmesan, and olive oil, tossing until the oil is evenly distributed and the crumbs look slightly darker and clump-bound. The oil ensures golden browning in the oven. Step 3 — Dredge the cutlets: Work one piece at a time: press the cutlet into the seasoned flour, shaking off any excess. Dip it into the beaten eggs, allowing surplus to drip back into the dish. Finish by pressing both sides firmly into the panko mixture so the crumbs adhere well. Place each coated cutlet skin-side up on the prepared tray. A firm but gentle press helps the panko form a continuous crust. If pieces are very wet, briefly rest them on a wire rack to help the coating set before baking. Step 4 — Bake until golden: Bake the cutlets 18 to 22 minutes or until the crust is lightly golden and an instant-read thermometer inserted into the thickest part reads 165 degrees Fahrenheit. Time varies with oven calibration and thickness. For extra color, switch to the broil setting for 1 to 2 minutes watching carefully to avoid burning. Step 5 — Rest and serve: Allow the cutlets to rest 3 to 5 minutes on the tray or a wire rack so juices redistribute. Serve with lemon wedges and chopped parsley. Resting keeps the meat moist and makes slicing neater, preventing juice loss onto the plate.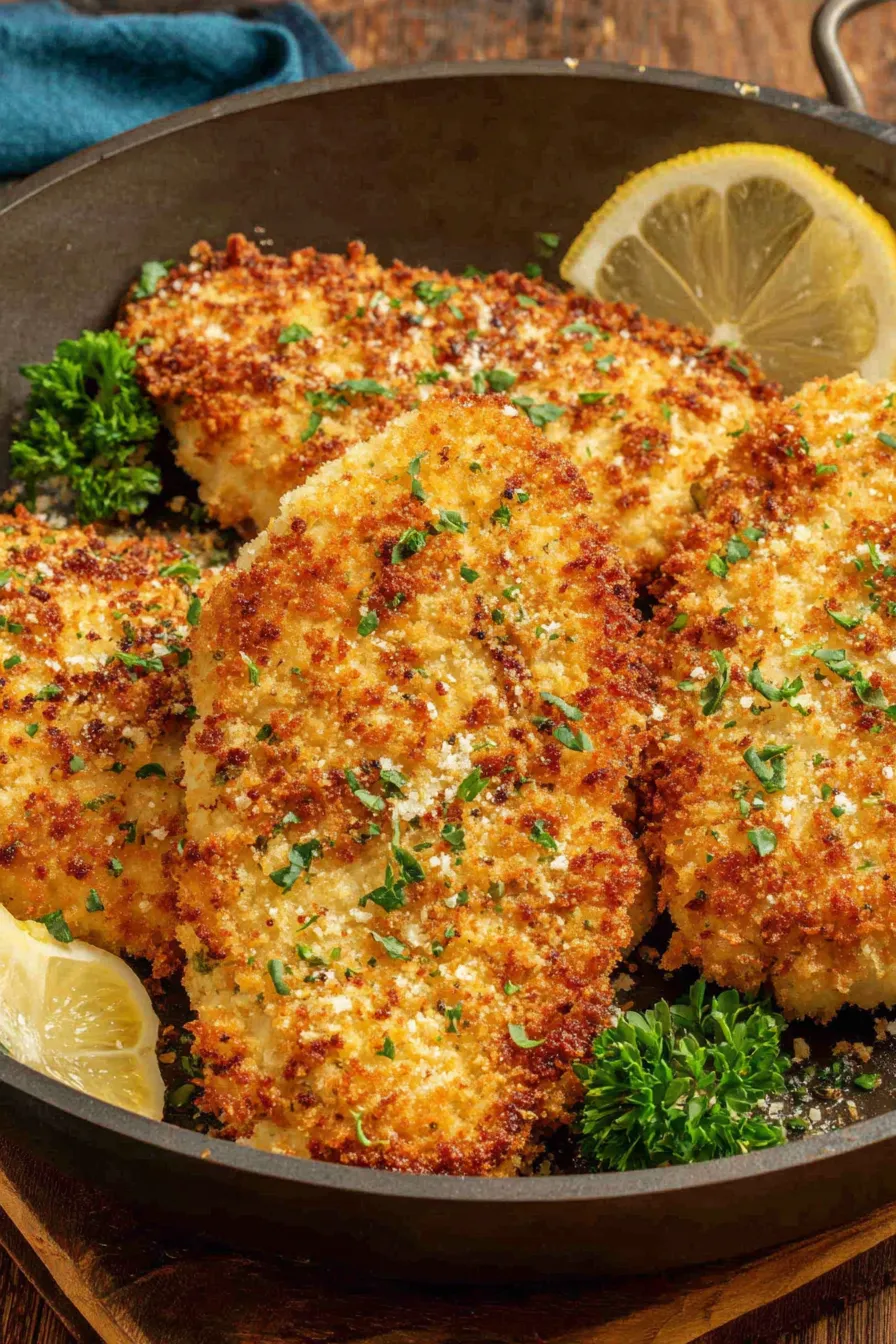
You Must Know
- This dish is not dairy-free due to Parmesan and contains egg and gluten from flour and panko, so it is not suitable for those with those allergies.
- Cooked cutlets freeze well for up to 3 months if wrapped tightly and stored in an airtight container. Reheat in a 350 degree Fahrenheit oven to restore crispness.
- Thin, uniform cutlets cook quickly; avoid overbaking which dries the meat. Use an instant-read thermometer for precision.
- Substituting olive oil with melted butter will increase browning and add richness but also increase saturated fat.
My favorite part is how reliably this method delivers texture: once you get comfortable with the dredging rhythm the process is almost meditative. The family always notices the crispness first and then the bright pop from a squeeze of lemon. It’s simple food that feels thoughtful, and I appreciate that it scales easily when guests show up unexpectedly.
Storage Tips
To store leftovers, let cutlets cool completely on a wire rack to prevent trapped steam which softens the crust. Place them in a single layer in an airtight container with parchment between layers or wrap individually in plastic and foil. Refrigerate for up to 4 days. For freezing, flash-freeze on a tray for 1 hour then transfer to a freezer bag for up to 3 months. Reheat frozen cutlets in a preheated 350 degree Fahrenheit oven for 15 to 20 minutes, or until warmed through and the coating crisps. Avoid microwaving directly as it will make the crust soggy.
Ingredient Substitutions
If you need to avoid gluten, use certified gluten-free panko and a gluten-free flour blend for the first dredge. For a dairy-free choice omit Parmesan and increase seasonings with 1/2 teaspoon smoked paprika and 1/2 teaspoon nutritional yeast for umami. Swap olive oil for avocado oil for a higher smoke point. If you prefer a thinner coating, use less panko or halve the Parmesan. For extra herbaceous flavor add 1 tablespoon chopped fresh parsley or basil into the panko mix.
Serving Suggestions
Serve the cutlets with lemon wedges and a scattering of chopped parsley for freshness. They pair beautifully with simple sides like roasted potatoes, a crisp green salad with vinaigrette, or buttery mashed cauliflower for a lower carb option. For a casual meal, tuck the cutlets into crusty rolls with arugula and aioli for sandwiches. To dress up the plate, spoon a light pan sauce of capers, lemon, and butter over the cutlets just before serving.
Meal Prep Tips
Scale the procedure and cook a double batch on a weekend to have proteins ready for the week. Store cutlets in the refrigerator separated by parchment for up to 4 days. For quick lunches, slice and layer into grain bowls with roasted vegetables and a vinaigrette. Reheat in a convection toaster oven for 8 to 10 minutes to revive the crunch. Keep lemon wedges separate and add them just before eating to preserve brightness.
Seasonal Adaptations
In spring and summer, add fresh grated lemon zest and chopped herbs like tarragon or basil to the panko for a bright profile. In autumn and winter, swap some of the Parmesan for finely grated aged cheddar and add 1/2 teaspoon smoked paprika for warmth. Holiday variations include serving the cutlets with cranberry relish and roasted root vegetables or slicing them for warm salads topped with roasted squash and a maple-mustard dressing.
Cultural Background
Using panko for a crisp coating borrows from Japanese technique where the lighter, flakier crumbs create a distinct crunch. The method translates well to Western-style cutlets, combining the panko crunch with classic Western seasonings like garlic, onion powder, and Parmesan. This fusion of textures and flavors makes the recipe relatable across many tables and highlights how small technique changes can transform a familiar protein.
Final thought: This panko chicken offers an ideal balance of speed, texture, and flavor. It’s approachable enough for a busy weeknight and adaptable enough for a special gathering. Try it once and you will have a reliable go-to that invites creativity in the kitchen while delivering consistent results.
Pro Tips
For even cooking, pound or slice cutlets to uniform 3/4-inch thickness before dredging.
Press the panko mixture firmly onto the chicken so the coating adheres and forms a continuous crust.
Let cooked cutlets rest 3 to 5 minutes before slicing to keep the meat juicy.
If broiling to finish, watch closely and broil only 1 to 2 minutes to avoid burning.
This nourishing panko chicken recipe is sure to be a staple in your kitchen. Enjoy every moist, high protein slice — it is perfect for breakfast or as a wholesome snack any time.
FAQs about Recipes
Can I reheat the panko chicken?
Yes. To reheat and restore crispness, place the cutlets on a wire rack in a 350 degree Fahrenheit oven for 8 to 12 minutes until warmed through.
How can I make this gluten-free or dairy-free?
Use certified gluten-free panko and a gluten-free flour blend. Omit Parmesan for dairy-free, replacing with nutritional yeast for umami if desired.
Tags
Panko Chicken
This Panko Chicken recipe makes perfectly juicy, tender, and flavorful steak every time! Serve with potatoes and a side salad for an unforgettable dinner in under 30 minutes.
Ingredients
Breading and seasonings
Chicken
Garnish (optional)
Instructions
Preheat and line pan
Preheat oven to 425 degrees Fahrenheit and line a rimmed baking tray with aluminum foil. Position the oven rack in the middle for even heat distribution.
Mix dry and wet components
Combine flour, garlic powder, onion powder, salt, and black pepper in the first shallow dish. Beat two eggs in a second dish. In a third dish toss panko with grated Parmesan and 3 tablespoons olive oil until evenly moistened.
Dredge the chicken
Coat both sides of each cutlet in the flour mixture, then in the beaten eggs, and finally press into the panko mixture ensuring an even, adherent crust. Shake off excess at each stage.
Bake until done
Place coated cutlets on the prepared tray and bake 18 to 22 minutes until golden and an instant-read thermometer registers 165 degrees Fahrenheit at the thickest part. Broil 1 to 2 minutes for extra color if desired.
Rest and garnish
Let the cutlets rest 3 to 5 minutes before serving. Garnish with chopped parsley and lemon wedges and slice as desired.
Last Step: Please leave a rating and comment letting us know how you liked this recipe! This helps our business to thrive and continue providing free, high-quality recipes for you.
Nutrition
Did You Make This?
Leave a comment & rating below or tag
@paletina on social media!
Categories:
You might also like...

Chocolate Chunk Marshmallow Brownies
Ultra-fudgy brownies packed with chocolate chunks, crowned with gooey marshmallows and glossed with warm chocolate frosting for a decadent crowd-pleaser.

Buttery Pecan Pie Bars
Buttery shortbread crust topped with a gooey brown sugar-pecan filling. Ten minutes to prep, irresistibly crunchy edges, and perfect for make-ahead treats.

Creamy Pumpkin Cheesecake
Silky, crack-free pumpkin cheesecake with warm spice, buttery graham crust, and make-ahead convenience for showstopping holiday dinners.
Did You Make This?
Leave a comment & rating below or tag @paletina on social media!
Rate This Recipe
Share This Recipe
Enjoyed this recipe? Share it with friends and family, and don't forget to leave a review!
Comments (1)
This recipe looks amazing! Can't wait to try it.
Comments are stored locally in your browser. Server comments are displayed alongside your local comments.

Hi, I'm Isabella!
What's Popular

30-Minute Meals!
Join to receive our email series which contains a round-up of some of our quick and easy family favorite recipes.