
>>

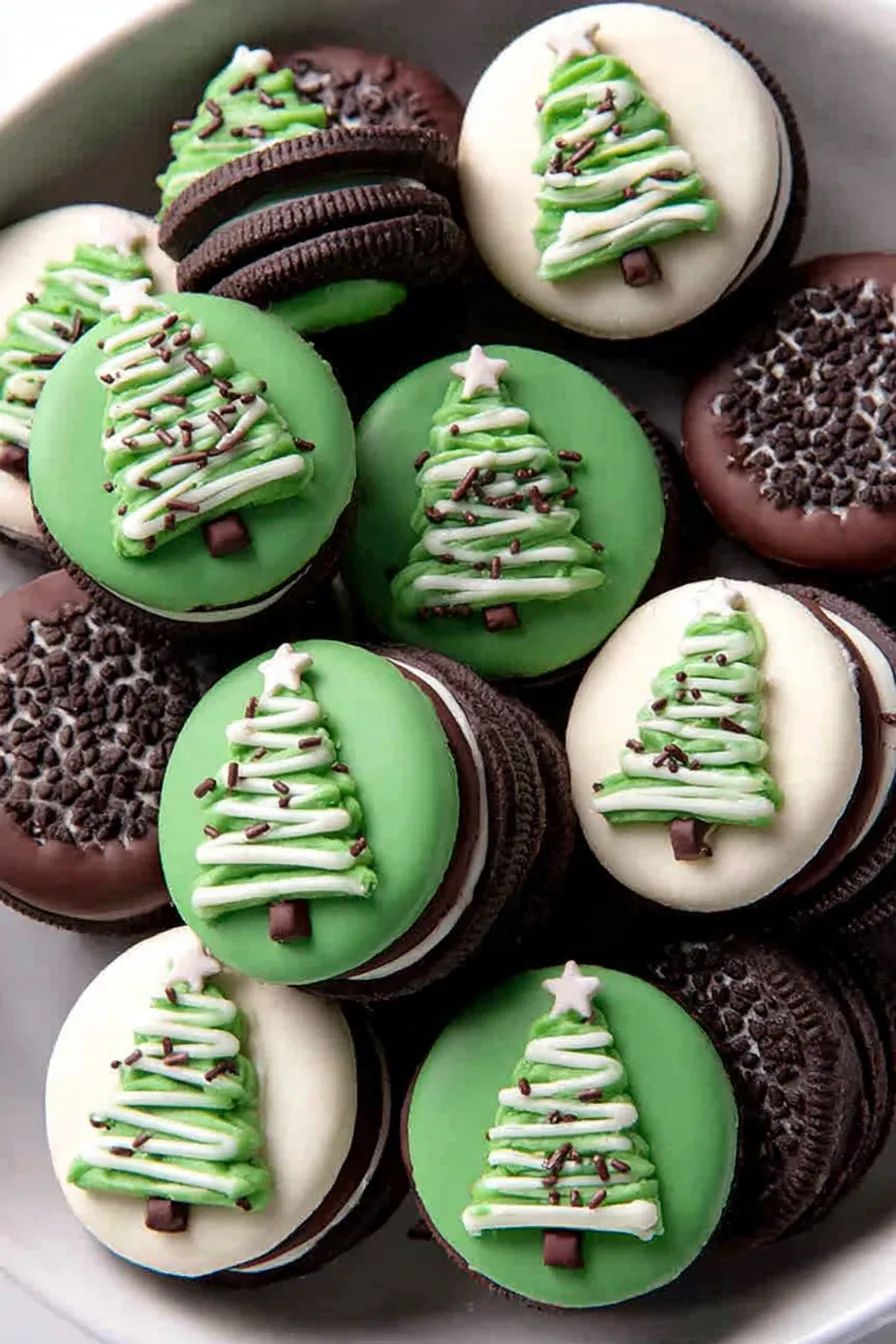
Festive Oreo cookies decorated into tiny Christmas trees with white and green coating — a quick, no-bake holiday treat perfect for parties and gift tins.

This little festive treat has been a holiday tradition in my kitchen for years: simple Oreo cookies transformed into tiny Christmas trees with a slick of white coating and a green piped tree that makes even the busiest weeknight feel celebratory. I first made these on a rainy December afternoon when I needed a fast gift for neighbors. The combination of crunchy cookie, creamy coating, and colorful decorations instantly won everyone over — they disappeared faster than I expected. They’re ideal when you want something charming without spending hours in the kitchen.
What makes these special is how accessible the ingredients are and how forgiving the technique is. You don’t need to temper chocolate or own specialized tools; a microwave, a bowl, a piping bag, and 15 Oreo cookies are enough. The texture contrast is delightful: the cool snap of the coating followed by the chewy cream center and cookie crunch. Every holiday season, someone asks for the recipe because these look impressive but come together in under 45 minutes from start to finish.
In my house these became the cookie everyone noticed on the dessert table. I took a tray to a neighborhood cookie swap once, and people asked if I’d made them from scratch. They love the whimsical look and the satisfying combination of textures; my niece still insists on helping pick the candy star toppers each year.
My favorite part is how a tiny change — a star on top and a green squiggle — makes an ordinary cookie feel festive. At neighborhood parties these are always the ones that draw a second look. They travel well when layered between parchment in a tin, which makes them perfect for giving as a homemade gift.

Store finished cookies in a single layer or separated by parchment sheets inside an airtight container to avoid scuffing the green decoration. At room temperature, they stay fresh for about 2–3 days; refrigeration extends that to a week but can sometimes dull the sheen of the melts. For longer storage, freeze the cookies in a single layer on a tray until firm, then transfer to a freezer-safe container with parchment layers — they keep well for up to 3 months. Thaw in the fridge before serving to reduce condensation on the surface.
If you can’t find green melting wafers, tint white candy melts with oil-based or candy coloring designed for chocolate — water-based liquid food coloring will seize chocolate. Swap Oreo cookies for other sandwich cookies of similar size, or use gluten-free sandwich cookies for dietary requirements (note: results will differ). Replace candy stars with small M&M’s, silver dragees, or sprinkles. For a darker look, use dark chocolate instead of white and pipe trees with a green royal icing if you prefer.
Serve on a festive platter lined with evergreen sprigs or tuck a few into holiday gift tins with red tissue paper. These pair nicely with hot chocolate, spiced cider, or a small espresso after a heavy holiday meal. For cookie exchanges, arrange them upright in a shallow box with clear cellophane so the tree shapes are visible. Garnish plates with powdered sugar “snow” for seasonal flair.
Transforming simple cookies into holiday shapes is a modern twist on the centuries-old tradition of festive confections. While sandwich cookies are American in origin, decorating cookies for special occasions is common worldwide. This adaptation — turning mass-produced sandwich cookies into decorated mini-trees — reflects a practical, contemporary approach to holiday baking where convenience and creativity meet.
For a winter white theme, use silver dragees and pale blue wafers instead of green. For a rustic holiday table, use pretzel sticks for trunks and swap colorful stars for small chocolate chips. You can make Halloween versions with orange melts and candy pumpkins, or Valentine’s trees using pink wafers and heart sprinkles — the technique stays the same, only the palette changes.
To prepare for a party, dip the Oreos in white chocolate the day before and refrigerate them in a single layer. Pipe the green trees and add toppers on the day you’ll serve them to avoid any potential color migration or tackiness. Use disposable piping bags for quick cleanup, and line trays with parchment so you can transport decorated cookies with minimal risk of damage.
These tiny tree cookies are proof that festive baking doesn’t have to be complicated. With minimal equipment and a little patience, you can produce a stack of charming treats that taste as good as they look. Enjoy gifting them or setting out a tray for unexpected holiday guests — they always spark conversation and a smile.
Warm your dipping bowl slightly by resting it on a warm (not hot) surface to keep the white chocolate fluid while you work.
Work in small batches so the chocolate doesn’t thicken; rewarm briefly in the microwave in 10-second bursts if necessary.
To get a neat piping line, cut a very small corner of the bag and increase the opening only if you need thicker lines.
If green melts start to thicken, add 1/8 teaspoon neutral oil and stir to restore flow; avoid adding water at all costs.
Press toppers onto the green chocolate immediately so they adhere before the coating sets.
This nourishing christmas oreo tree cookies recipe is sure to be a staple in your kitchen. Enjoy every moist, high protein slice — it is perfect for breakfast or as a wholesome snack any time.
Yes — refrigerated for 10–15 minutes they will set faster. Avoid prolonged refrigeration if you want the melts to stay glossy.
Replace Oreo cookies with similar-sized sandwich cookies or gluten-free alternatives, though texture and flavor will vary.
This Christmas Oreo Tree Cookies recipe makes perfectly juicy, tender, and flavorful steak every time! Serve with potatoes and a side salad for an unforgettable dinner in under 30 minutes.
Line a pan with parchment paper and gather all ingredients and tools. Allow Oreos to come to room temperature for best adhesion and have piping materials ready.
Place 6 oz white melting chips in a microwave-safe bowl. Microwave for 30 seconds, stir, then heat in 15–20 second bursts until smooth and glossy. Avoid overheating to prevent graininess.
Hold each Oreo and dip halfway into melted white chocolate. Tap off excess and place on parchment. Leave space for piping and allow the coating to firm slightly before decoration.
Melt 3 oz green wafers in a separate bowl, using 30-second intervals then stirring until fluid. If too thick, add a tiny 1/8 teaspoon of neutral oil to loosen the texture.
Transfer green chocolate to a piping bag, snip a very small corner, and pipe a triangular tree shape on the white-coated portion with steady back-and-forth strokes, building layers from bottom to top.
Press a candy star onto the top of each tree and use chocolate jimmies or a small pretzel to make the trunk. Let cookies set at room temperature or refrigerate 10–15 minutes until firm.
Last Step: Please leave a rating and comment letting us know how you liked this recipe! This helps our business to thrive and continue providing free, high-quality recipes for you.
Leave a comment & rating below or tag
@paletina on social media!

Ultra-fudgy brownies packed with chocolate chunks, crowned with gooey marshmallows and glossed with warm chocolate frosting for a decadent crowd-pleaser.

Buttery shortbread crust topped with a gooey brown sugar-pecan filling. Ten minutes to prep, irresistibly crunchy edges, and perfect for make-ahead treats.

Silky, crack-free pumpkin cheesecake with warm spice, buttery graham crust, and make-ahead convenience for showstopping holiday dinners.
Leave a comment & rating below or tag @paletina on social media!
Enjoyed this recipe? Share it with friends and family, and don't forget to leave a review!
This recipe looks amazing! Can't wait to try it.
Comments are stored locally in your browser. Server comments are displayed alongside your local comments.

Join to receive our email series which contains a round-up of some of our quick and easy family favorite recipes.
